Cisco Identity Services Engine (ISE) is the cornerstone of enterprise network access control. Meraki is the go-to platform for cloud-managed networking in branch offices and mid-market deployments. Getting the two working together gives you centralized authentication, guest management, device posturing, and dynamic policy enforcement — all across your wireless, wired, and VPN infrastructure.
This guide walks you through the full integration end to end: ISE device configuration, Meraki Dashboard setup for both wireless and wired, ISE policy sets, Central Web Authentication, Change of Authorization (CoA), and verification.
What You Can Achieve
| Use Case | Meraki Device | ISE Feature |
|---|---|---|
| WPA2/3-Enterprise (Dot1X) | MR Wireless | RADIUS Auth + AuthZ |
| Guest Central Web Auth (CWA) | MR Wireless | CWA + Redirect + CoA |
| Wired 802.1X + MAB | MS Switches | RADIUS Auth + CoA |
| Device posture assessment | MR + MS | Posture + CoA |
| Device profiling | MR 31.2+ | RADIUS Accounting / Device Sensor |
| VPN user authentication | MX Security Appliance | RADIUS Auth |
Prerequisites
Before starting, confirm you have:
- Cisco ISE 2.4+ (ISE 3.x recommended)
- Meraki firmware: MR 24.0+ for wireless CoA, MS 8.10+ for wired CoA
- Network reachability between Meraki devices and ISE:
- UDP 1812 (RADIUS auth)
- UDP 1813 (RADIUS accounting)
- UDP 1700 (CoA from ISE to Meraki)
- Admin access to both Meraki Dashboard and Cisco ISE
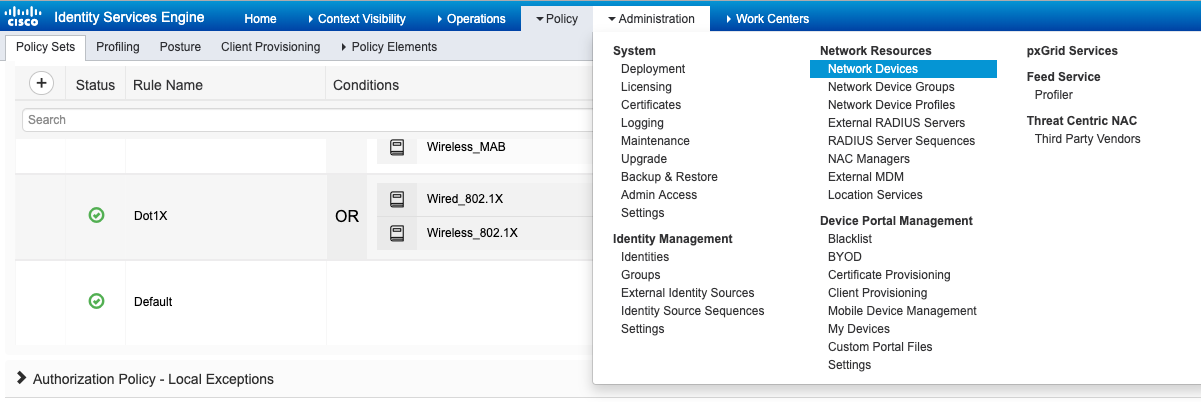
Step 1: Add Meraki as a Network Device in ISE
Every Meraki device that will send RADIUS requests to ISE must be registered as a Network Device.
Navigate to Administration > Network Resources > Network Devices and click Add.
Fill in the device details and scroll down to RADIUS Authentication Settings. Check the box and enter a Shared Secret — this must match exactly what you configure in the Meraki Dashboard later.
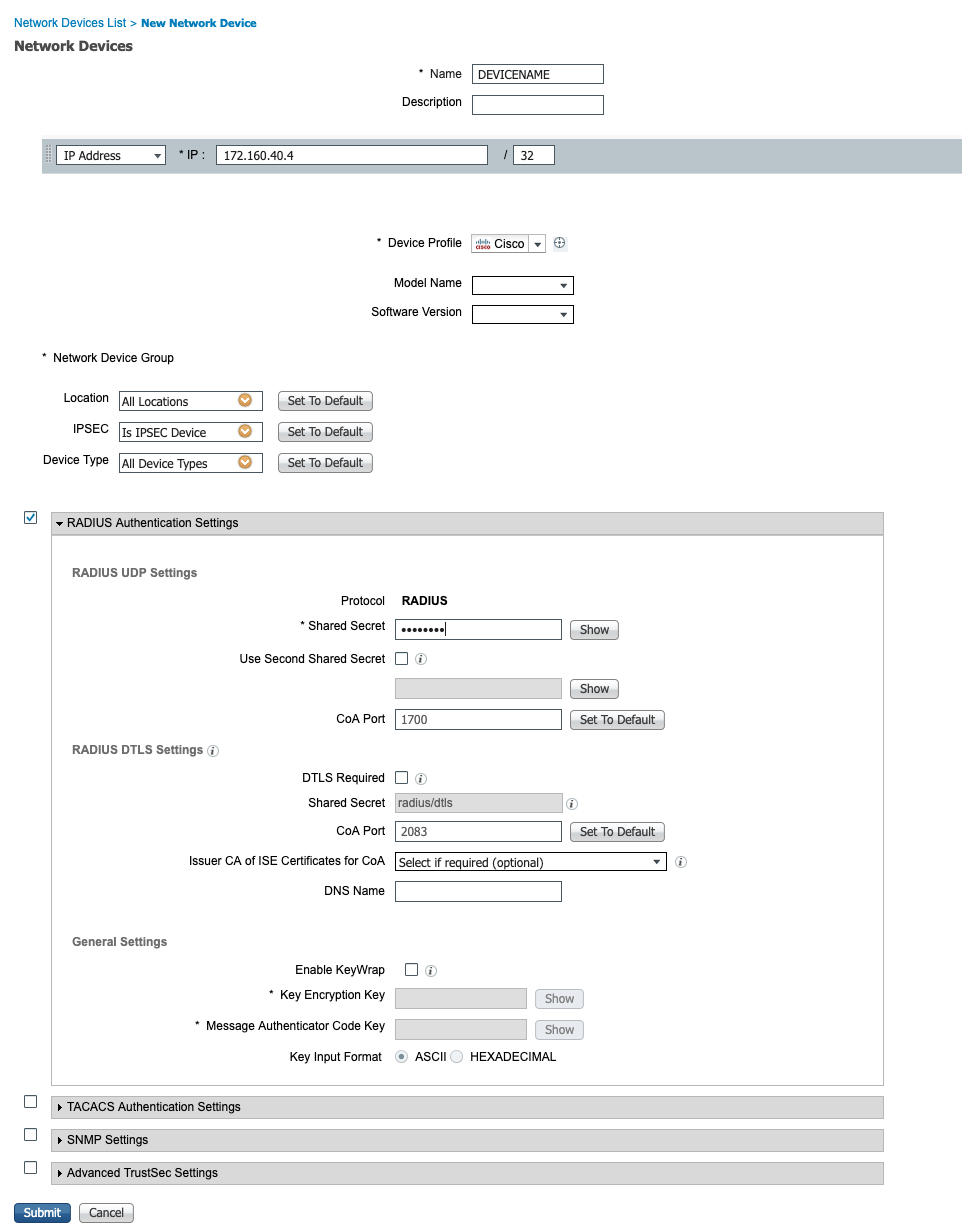
| Field | Value |
|---|---|
| Name | Descriptive name (e.g. Meraki-MR-Branch1) |
| IP Address | Meraki AP, switch, or MX IP |
| Shared Secret | Strong password — must match Meraki config |
Tip: For large deployments, configure a Default Network Device under Administration > Network Resources > Default Network Device with a shared secret. This lets all Meraki devices authenticate without pre-registering every single device.
Step 2: Configure Meraki Wireless (MR) — CWA Guest Flow
For guest networks, Meraki uses Central Web Authentication (CWA): the AP forwards the client’s MAC to ISE, ISE returns a redirect URL, and the client is sent to the ISE guest portal to authenticate.
How the Packet Flow Works
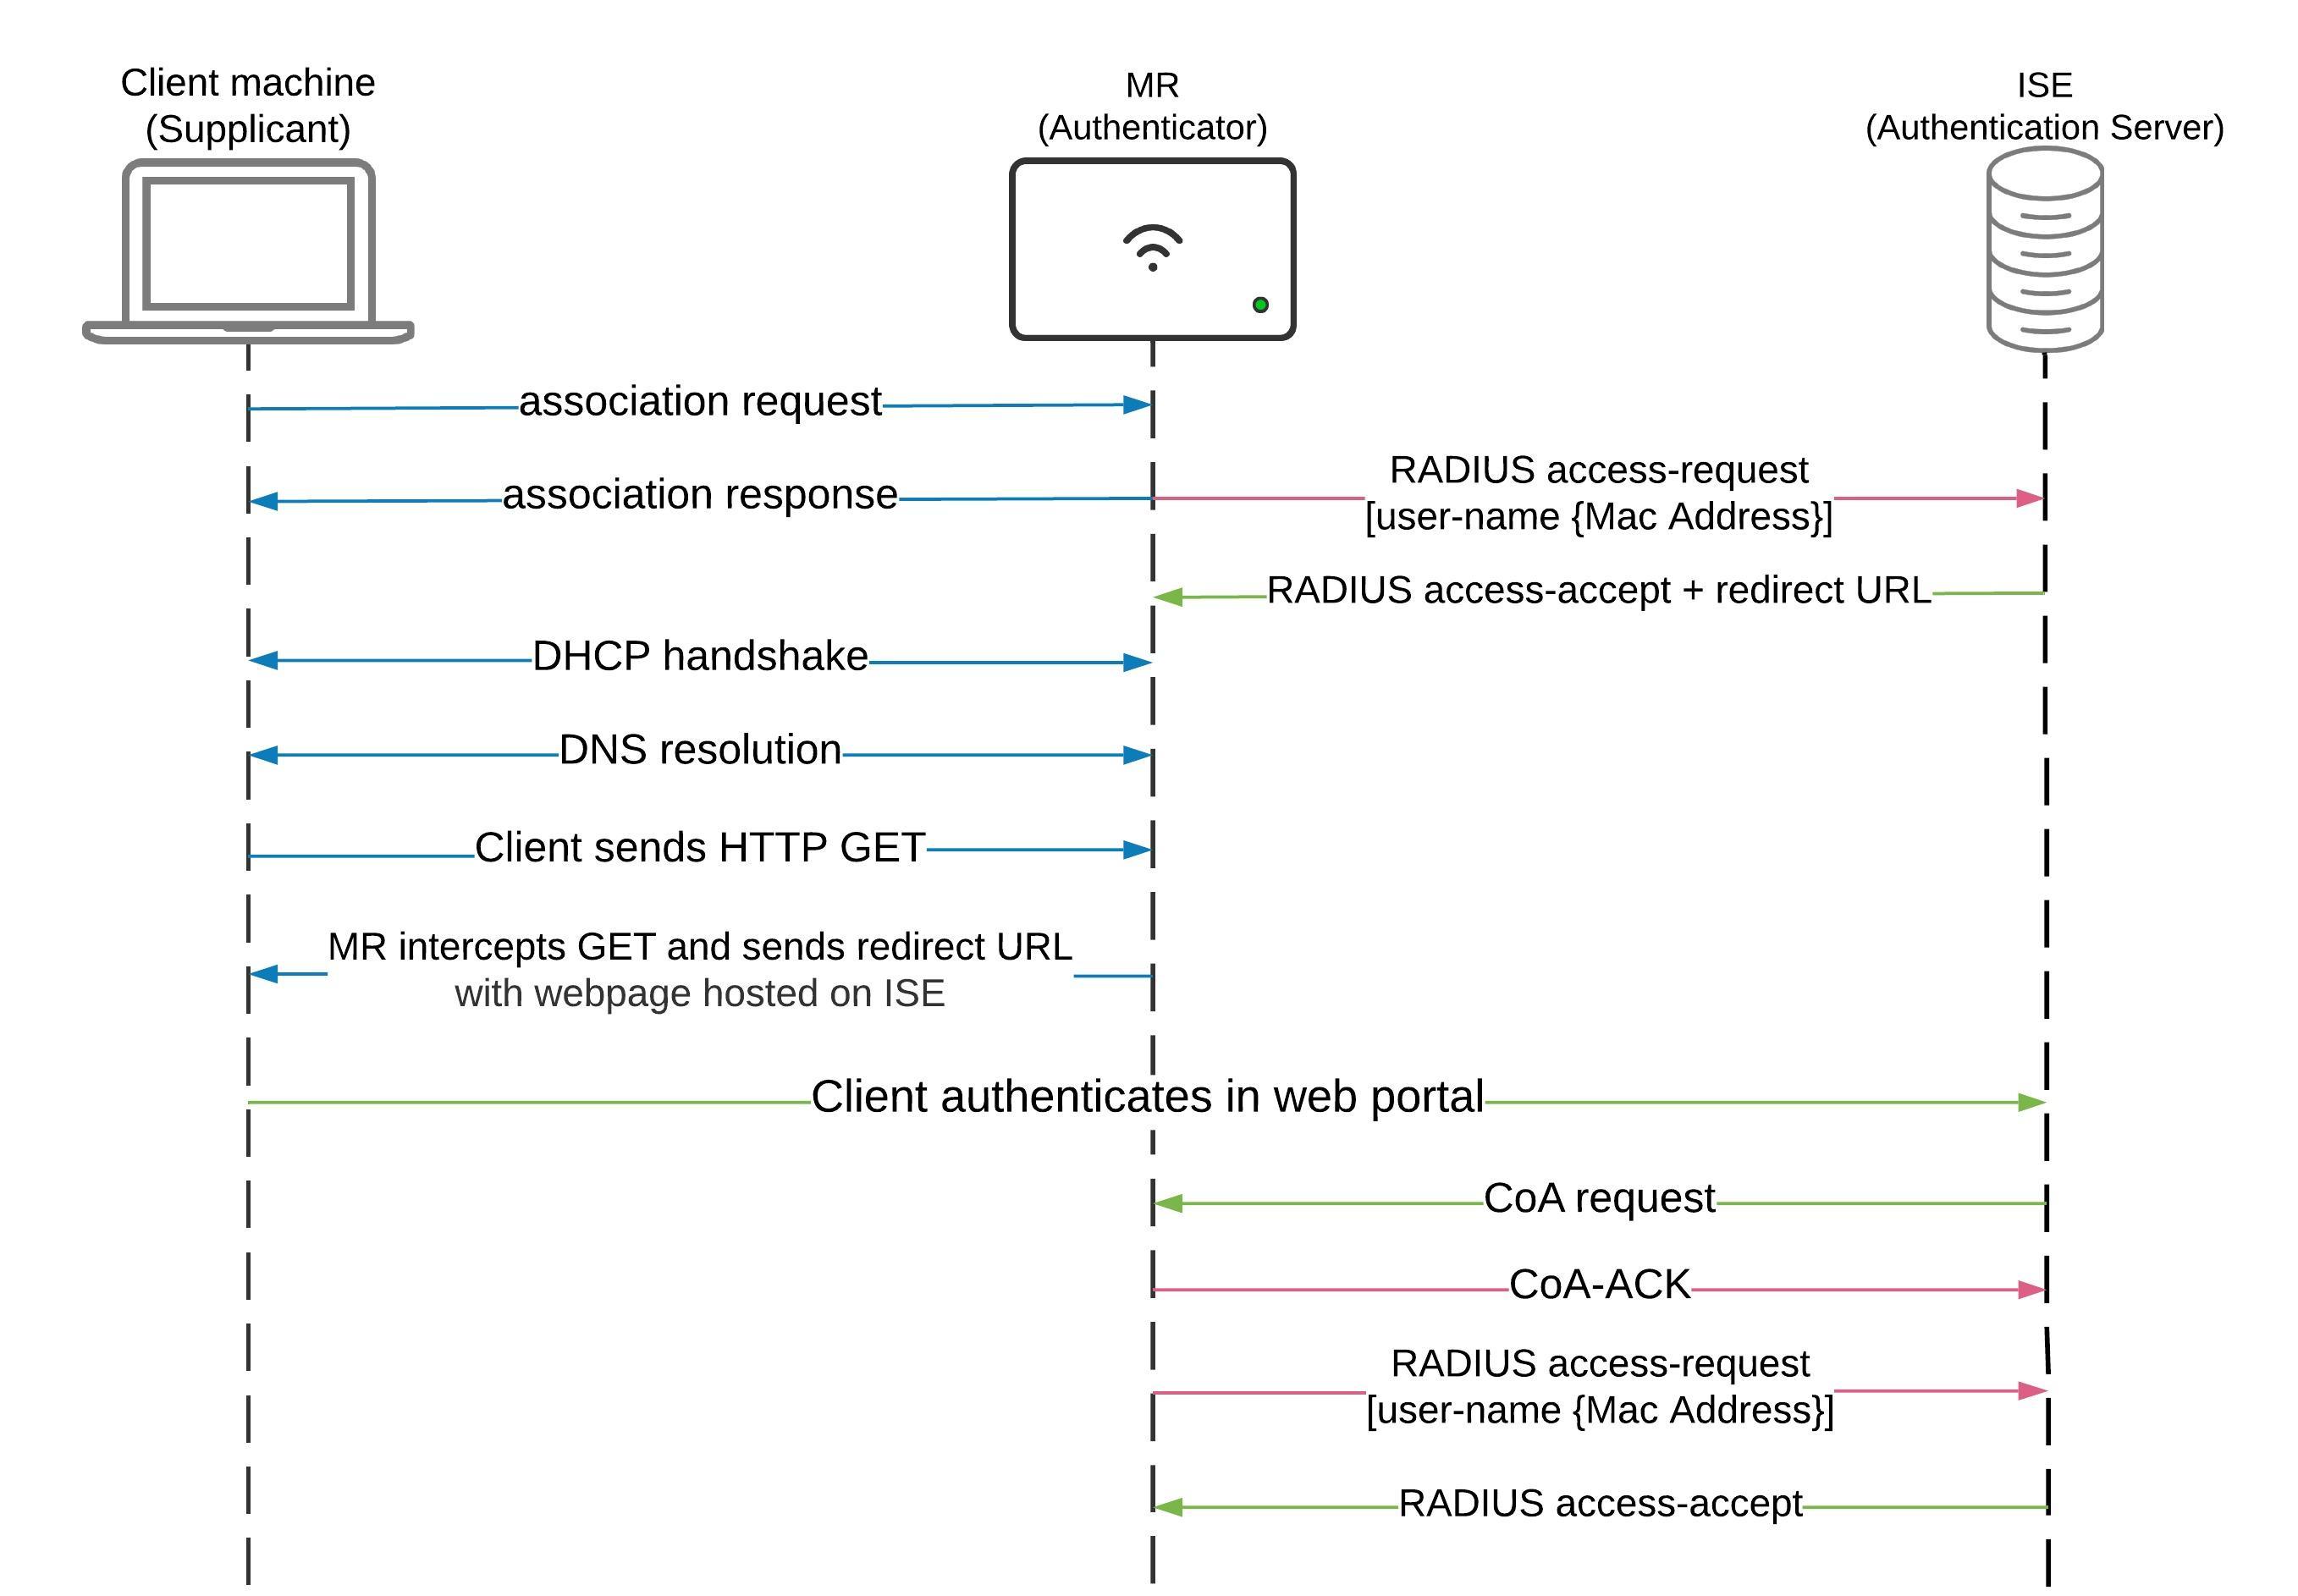
- Client associates to the SSID
- MR sends the client MAC as a RADIUS Access-Request to ISE
- ISE returns Access-Accept with a redirect URL
- Client gets an IP via DHCP
- Client sends an HTTP GET — MR intercepts it and redirects to the ISE portal
- Client authenticates on the ISE web portal
- ISE sends a CoA request (UDP 1700) to the MR
- MR sends CoA-ACK and reauthenticates the client
- ISE grants full access
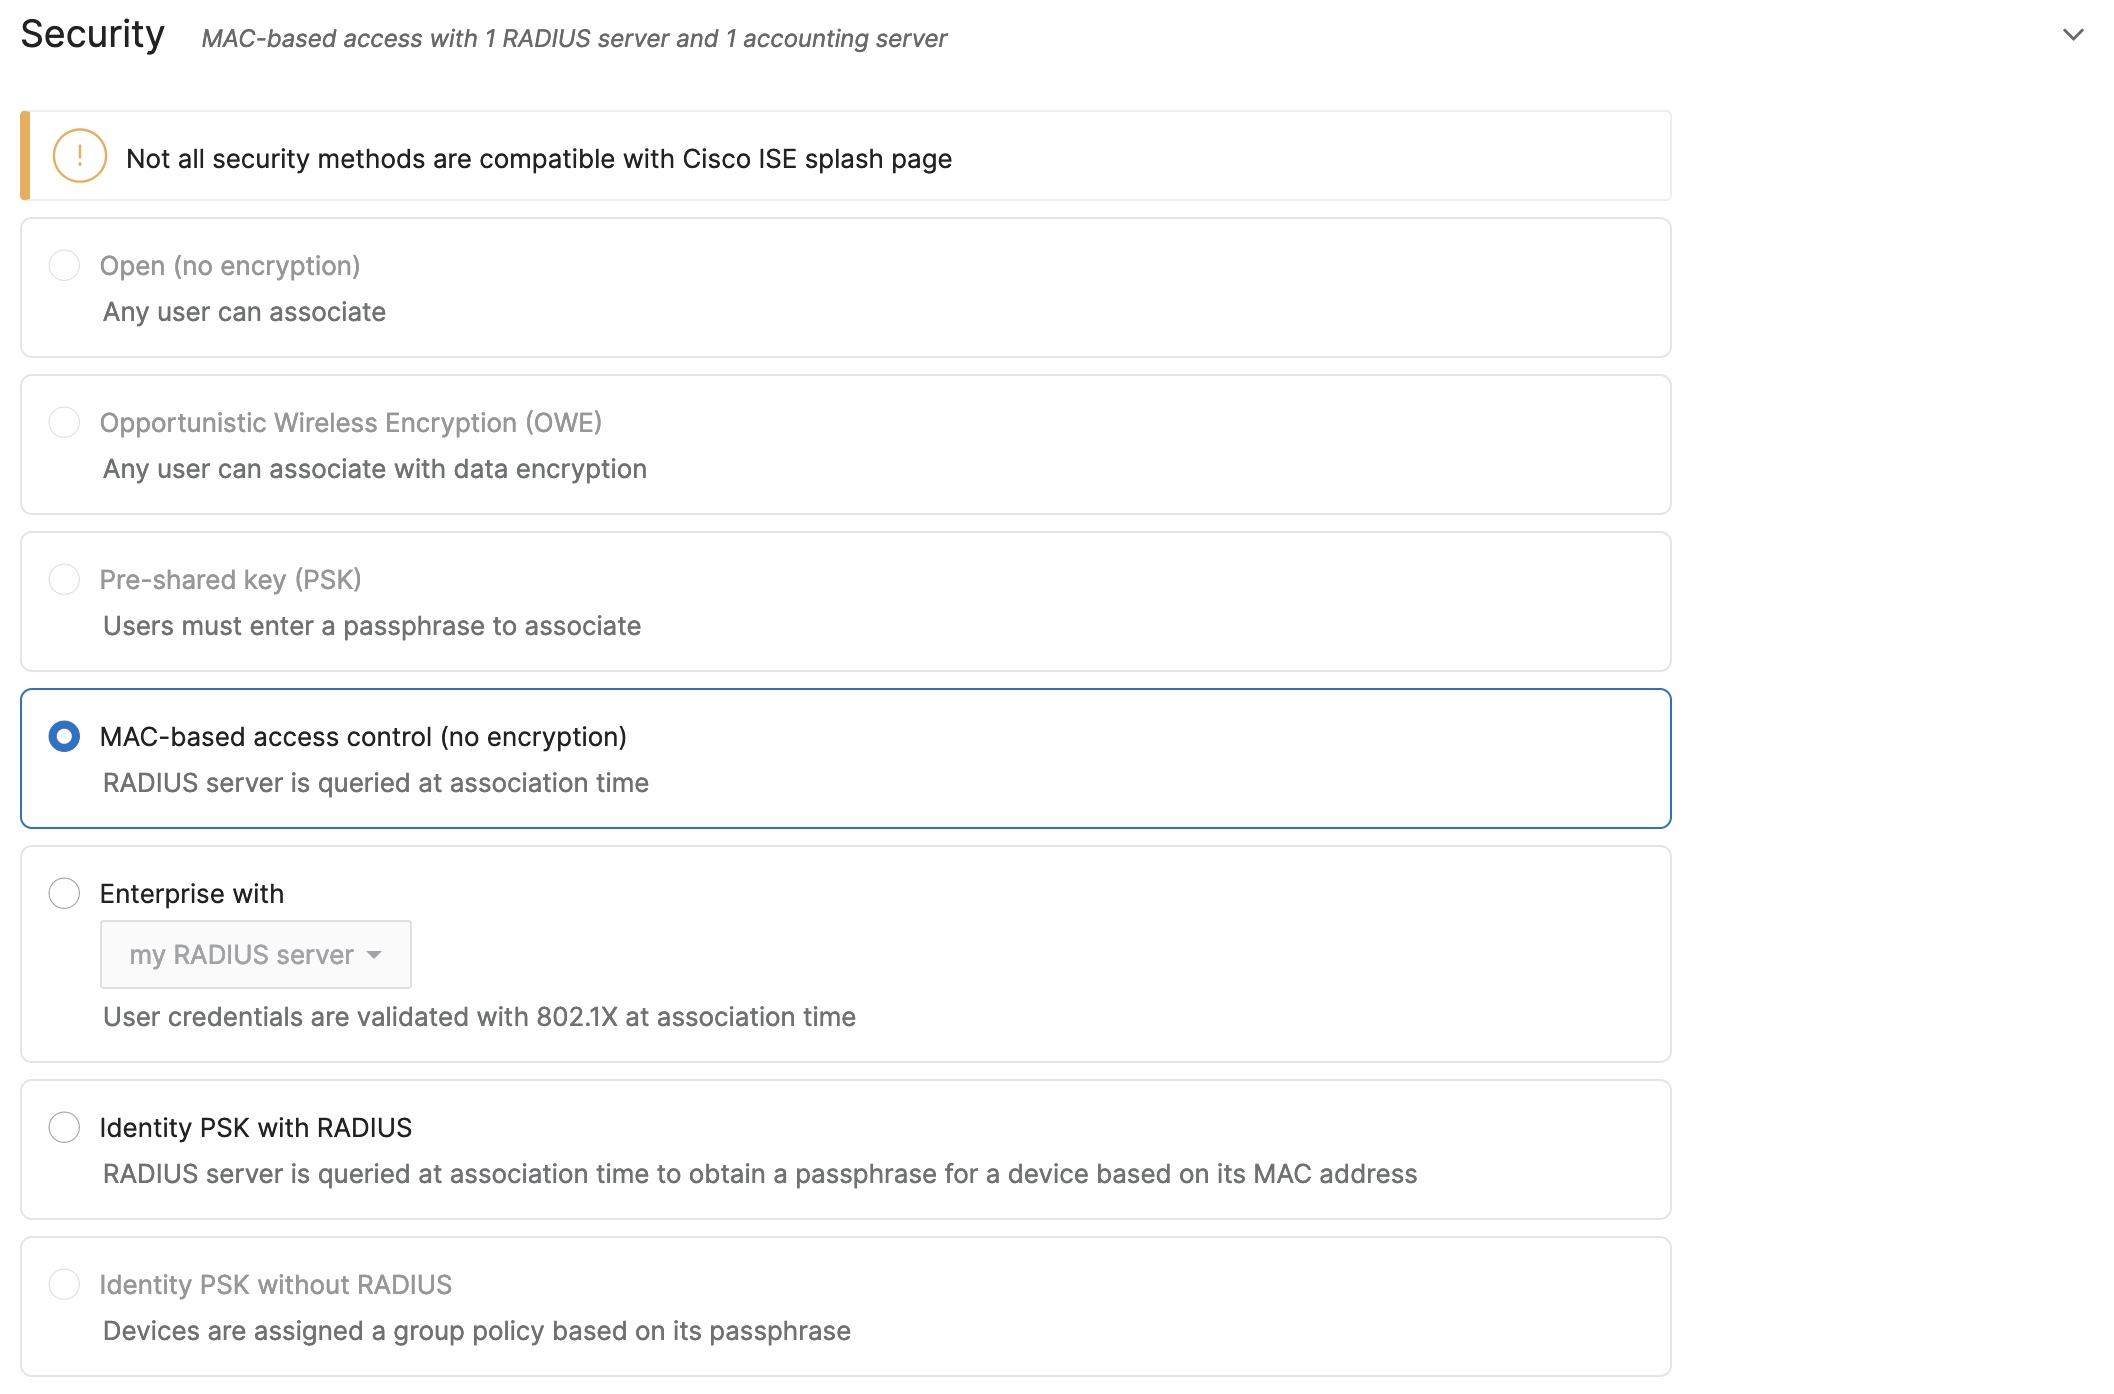
Configure MAC-Based Authentication
In the Meraki Dashboard, go to Wireless > Configure > Access Control, select your guest SSID, and set Security to MAC-based access control (no encryption).
Configure the RADIUS Server
Under the RADIUS section, add your ISE PSN as a RADIUS server. Enable RADIUS CoA support and set the group policy attribute to Airespace-ACL-Name.
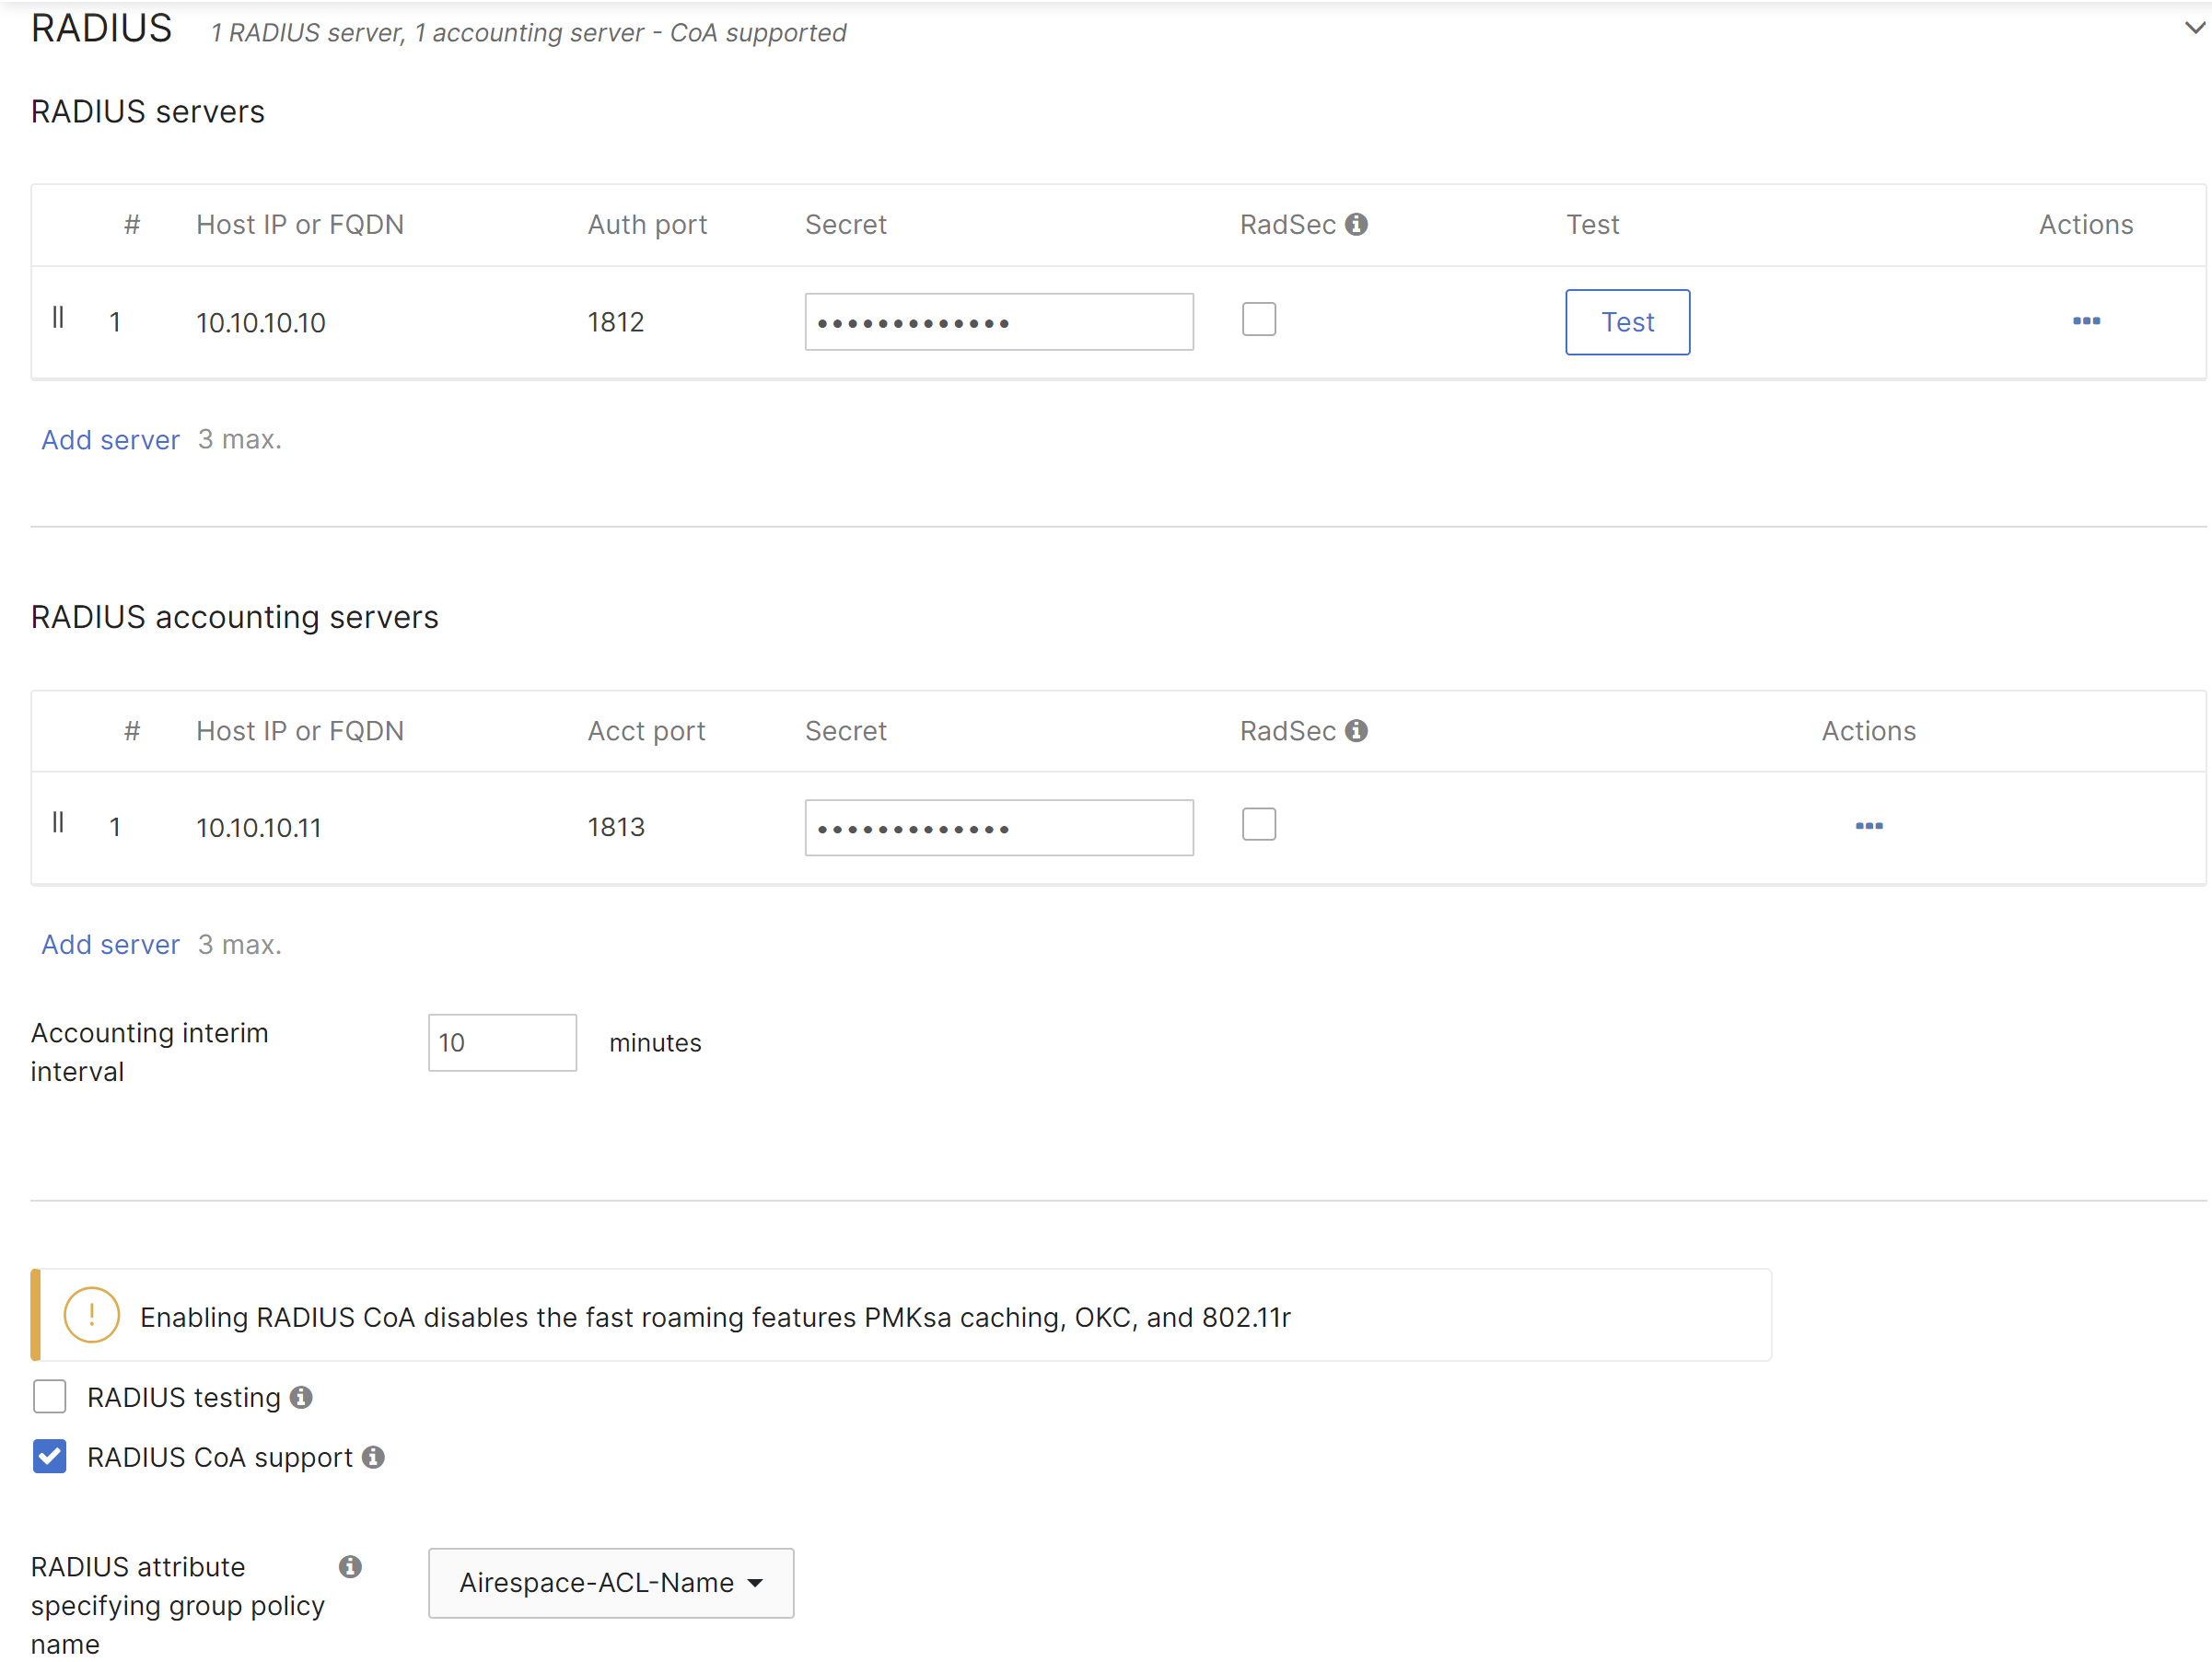
| Field | Value |
|---|---|
| Host IP or FQDN | ISE PSN IP address |
| Auth port | 1812 |
| Accounting port | 1813 |
| Secret | Must match ISE shared secret |
| RADIUS CoA support | ✅ Enabled |
| Group policy attribute | Airespace-ACL-Name |
Select ISE as the Splash Page
Under the Splash page section, select Cisco Identity Services Engine (ISE) Authentication. This tells the AP to honor the URL-redirect attribute returned by ISE.
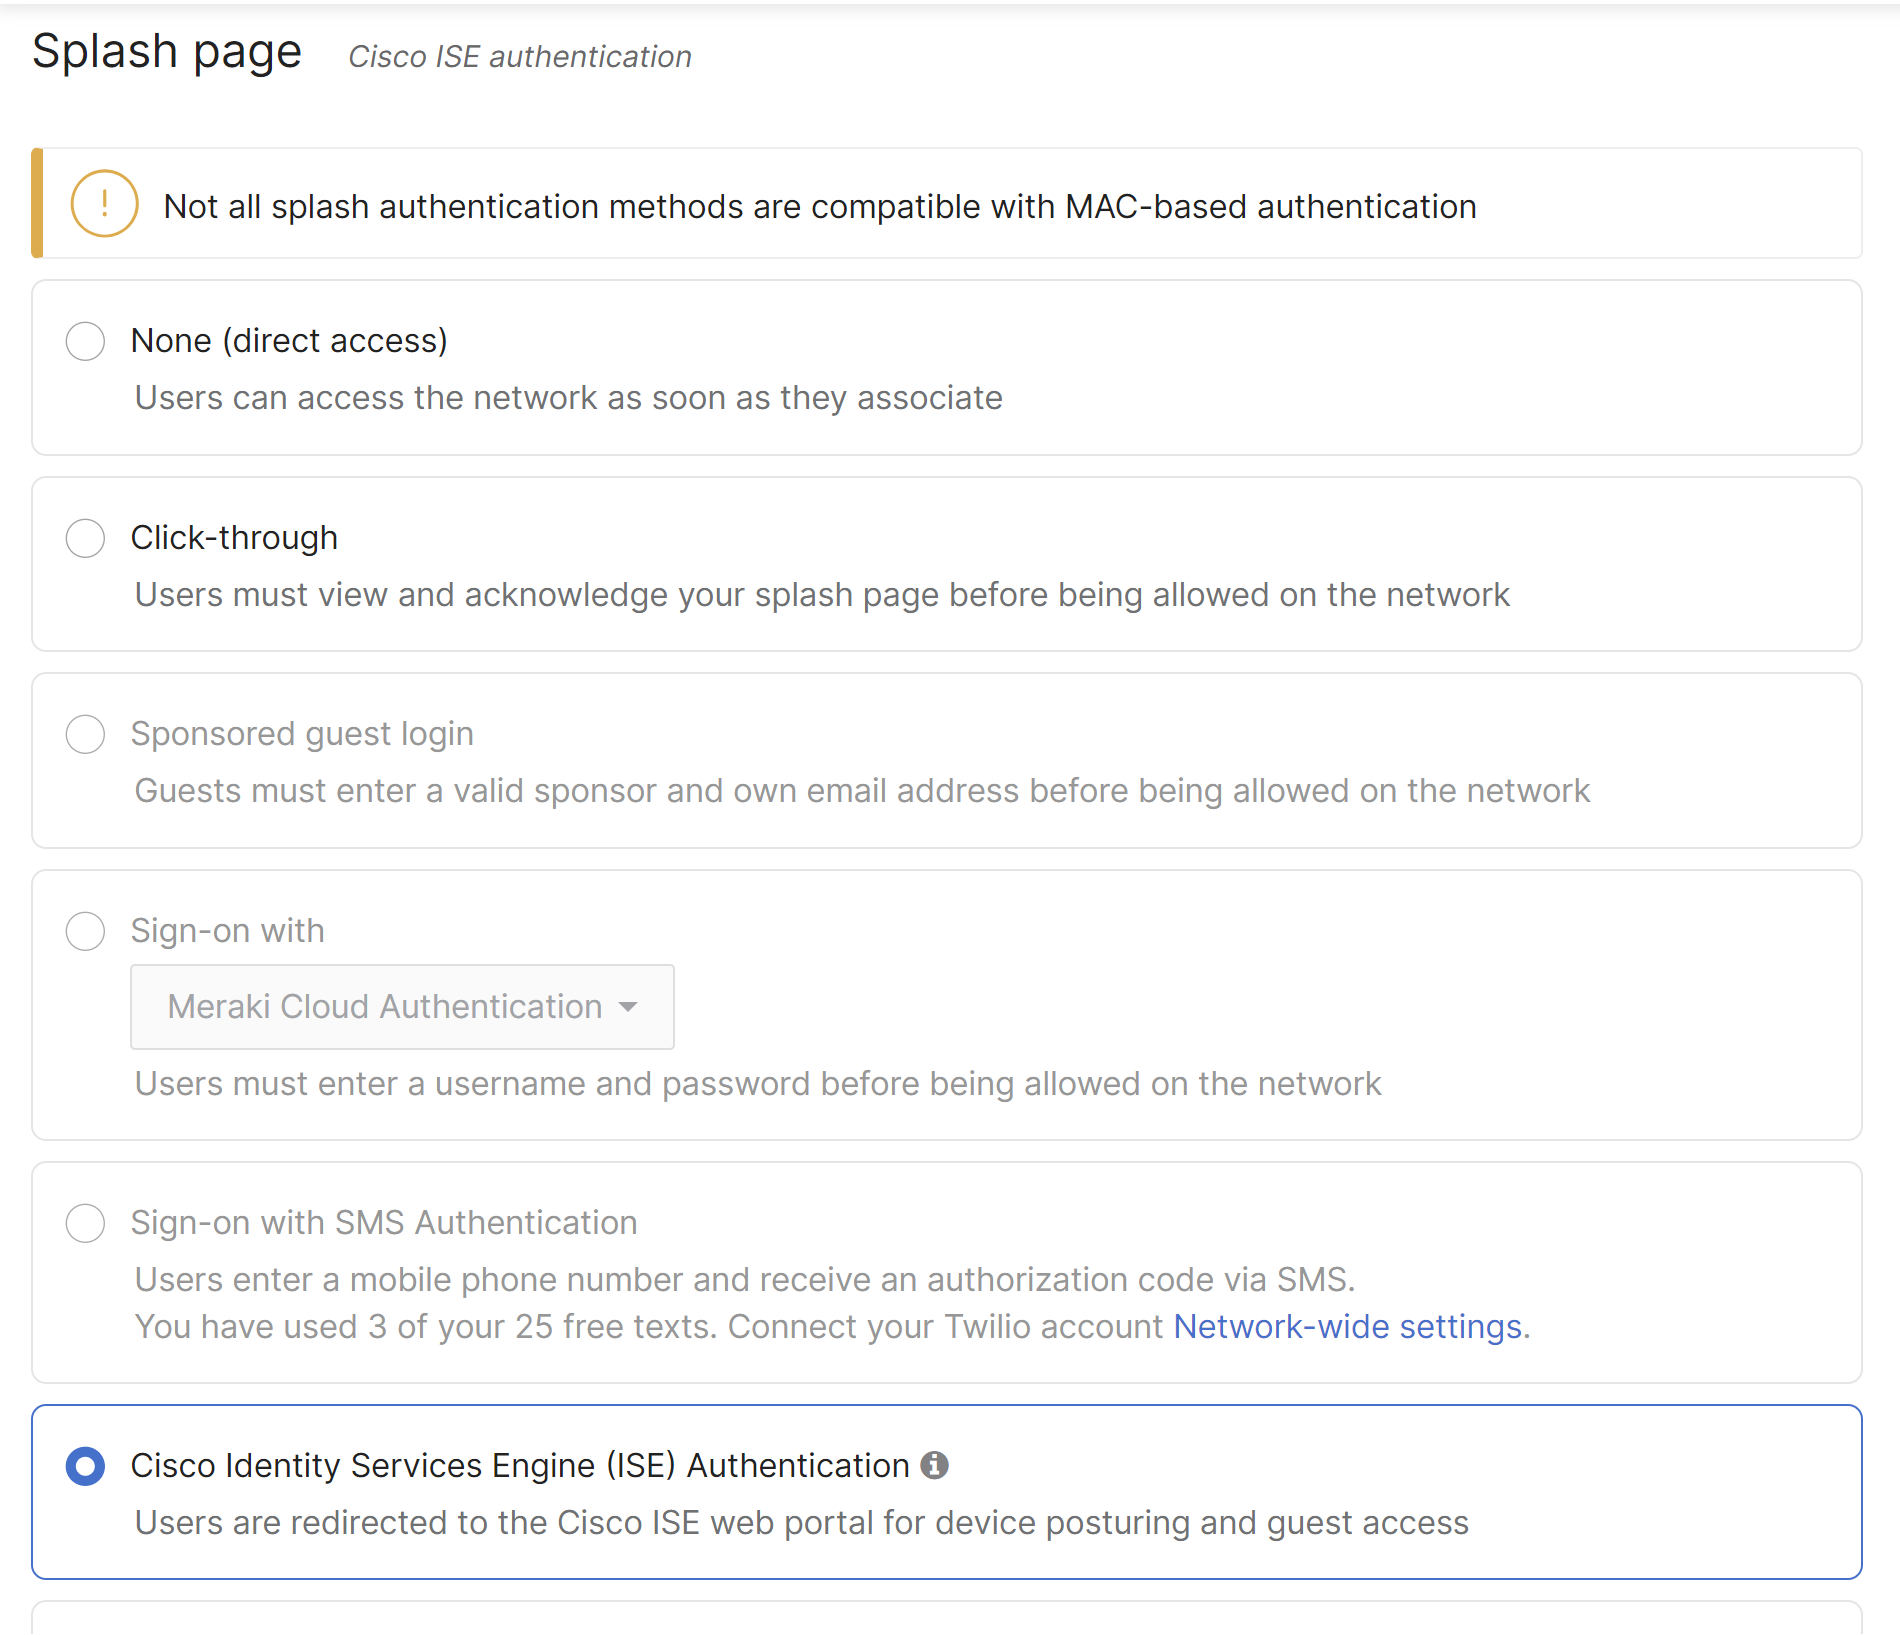
Important: Do NOT use Hybrid Authentication with Increase Access Speed — this will break CWA.
Configure the Walled Garden
Add the ISE PSN IP to the Walled garden under Advanced Splash Settings. This allows the redirect to work before the client is authenticated.
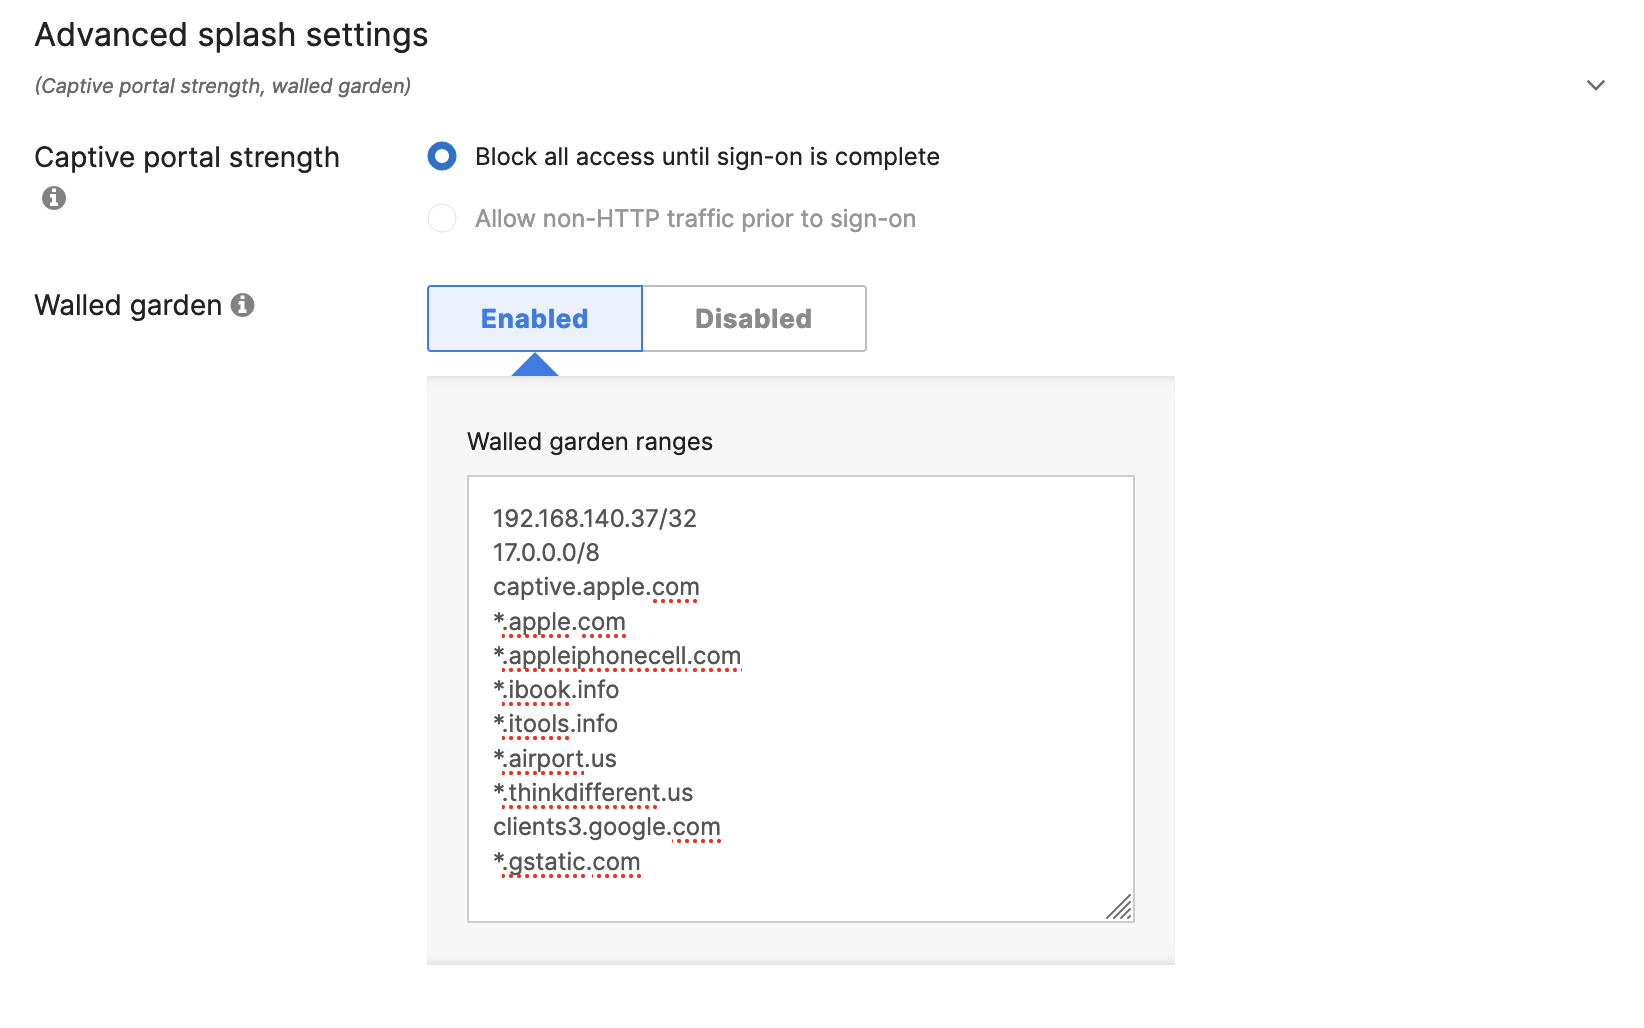
Also add these entries to prevent Apple/Android captive portal detection from interfering:
17.0.0.0/8
captive.apple.com
*.apple.com
clients3.google.com
*.gstatic.com
Step 3: Configure Meraki Wireless (MR) — WPA2/3-Enterprise (Dot1X)
For corporate SSIDs where users authenticate with Active Directory credentials:
- Go to Wireless > Configure > Access Control, select your corporate SSID
- Under Association requirements, select WPA2/WPA3-Enterprise
- Add ISE as the RADIUS server (same IP, port 1812, matching secret)
- CoA is automatically enabled when ISE splash is configured
Step 4: Configure Meraki Wired (MS Switches)
For wired 802.1X and MAC Authentication Bypass (MAB) on Meraki switches:
- Go to Switch > Configure > Access policies
- Click Add access policy
- Set Policy type to 802.1X or MAC authentication bypass (or both)
- Add ISE PSN as the RADIUS server
- Enable RADIUS CoA support
- Assign the access policy to switch ports under Switch > Configure > Switch ports
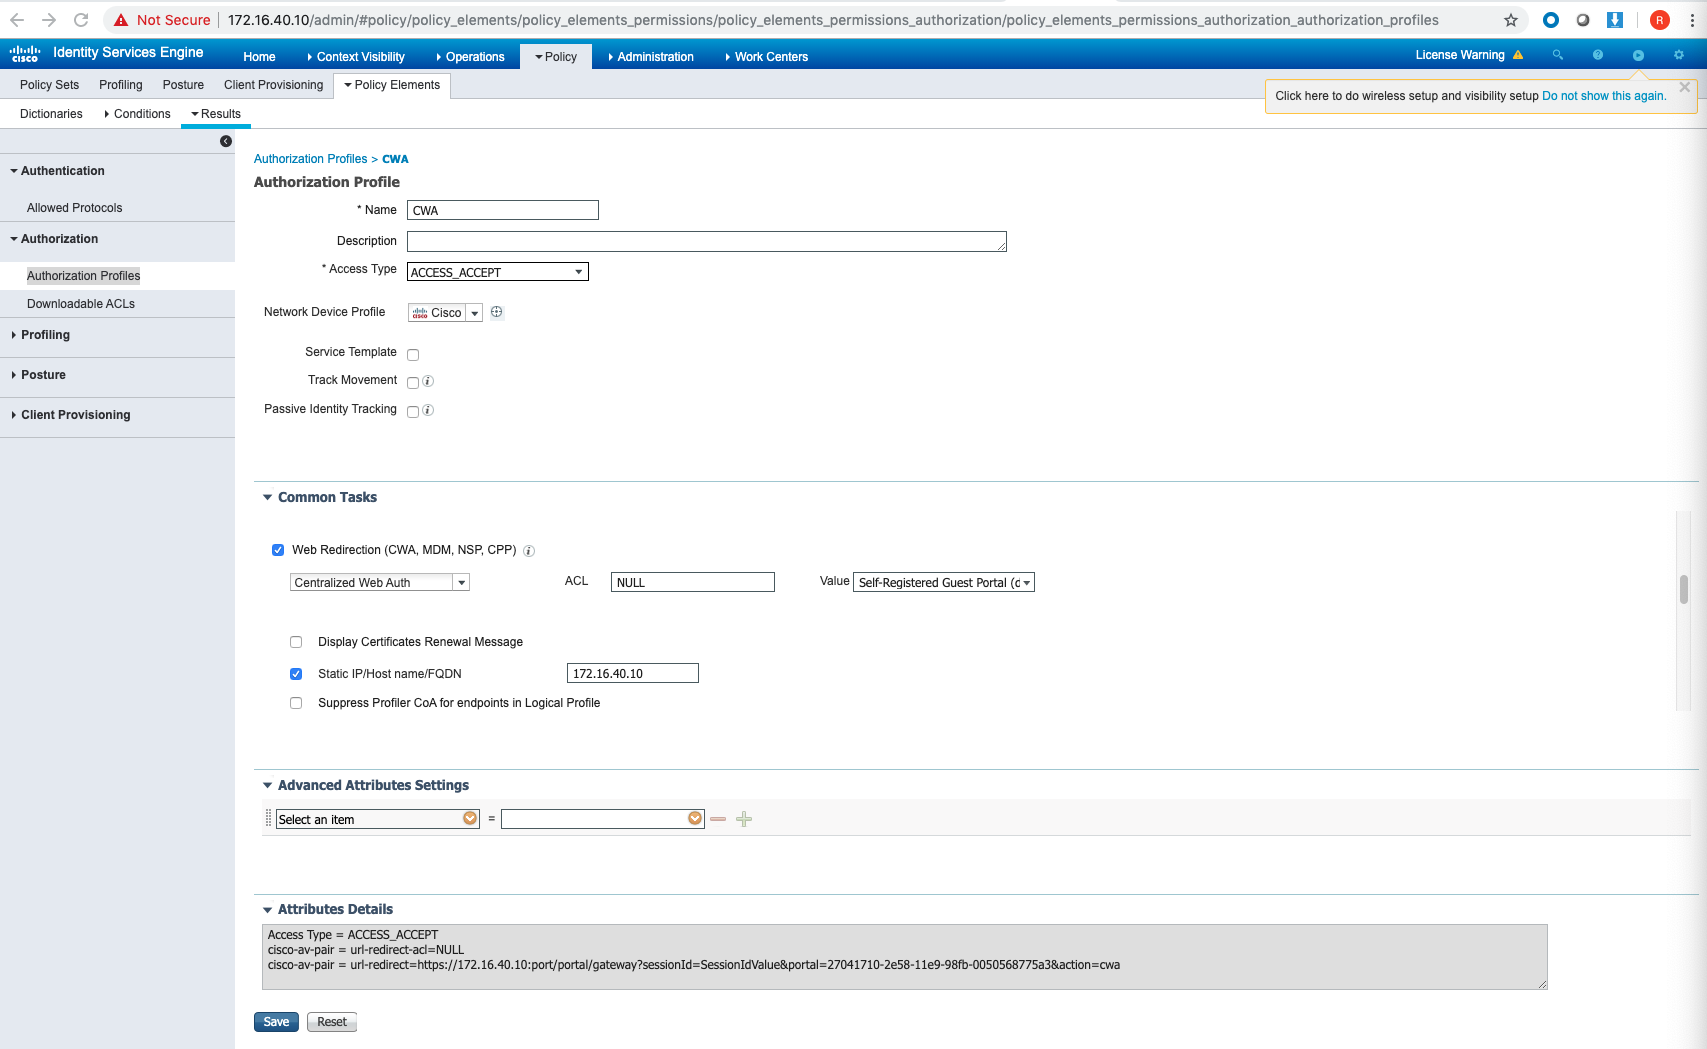
Step 5: Configure ISE — Authorization Profile for CWA
Before building policy, create the CWA redirect authorization profile.
Navigate to Policy > Results > Authorization Profiles and click Add.
- Name:
CWA_Redirect - Under Common Tasks, enable Web Redirection
- Type: Centralized Web Auth
- ACL: NULL
- Value: Self-Registered Guest Portal (or your custom portal)
Step 6: Configure ISE — Policy Sets
Policy Sets are where ISE decides which rules to apply to incoming RADIUS requests.
Navigate to Policy > Policy Sets and create a new set. Set the condition to match your Meraki SSID:
RADIUS:Called-Station-ID ENDS_WITH "Your-SSID-Name"
Authentication Policy
Inside the Policy Set, configure authentication rules:
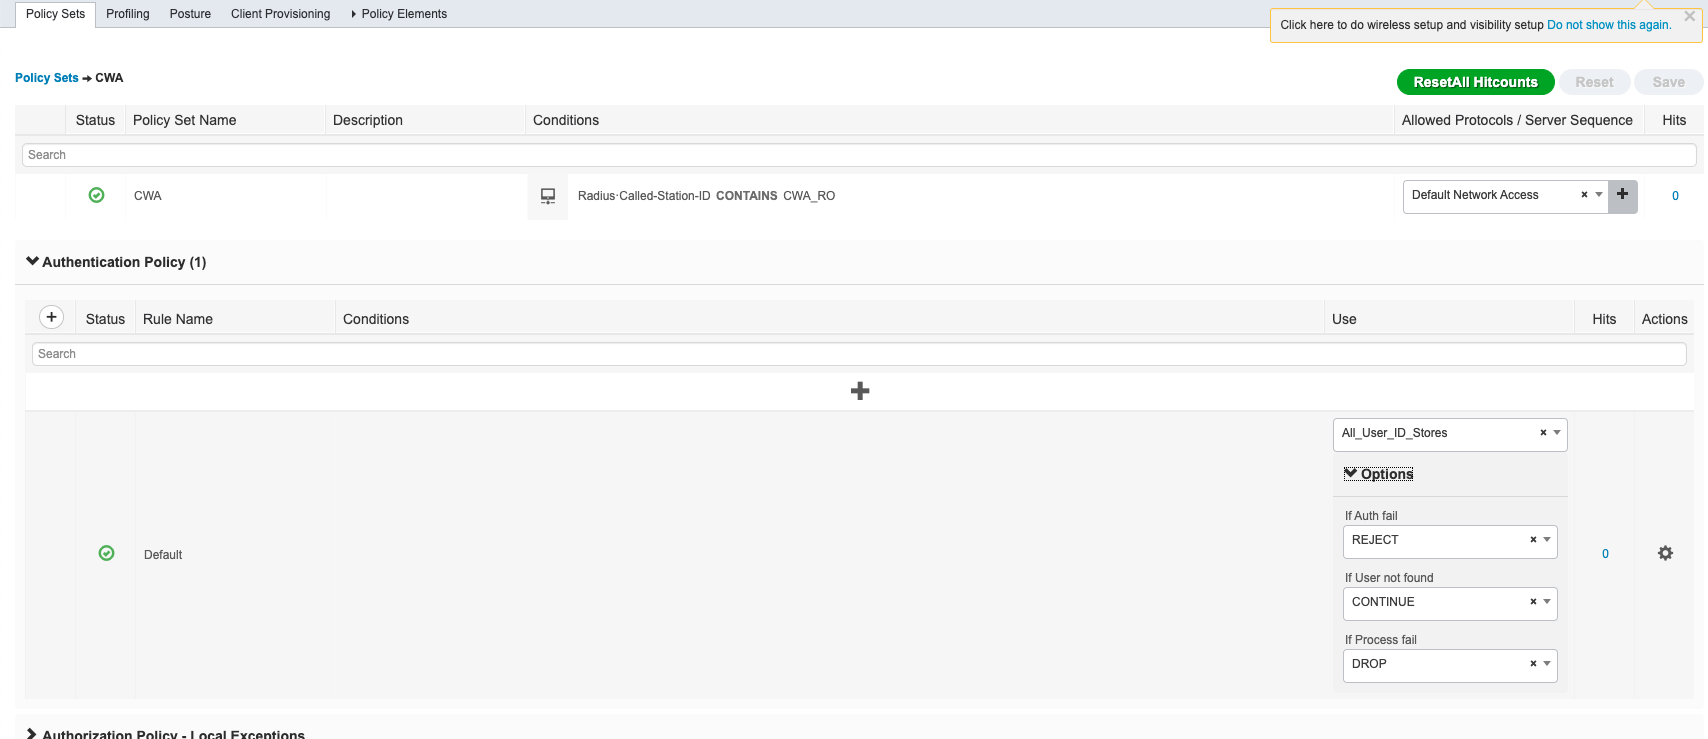
| Condition | Identity Store | If User Not Found |
|---|---|---|
| Wireless_MAB | Internal Endpoints | CONTINUE ← critical for CWA |
| Wireless_802.1X | Active Directory | Reject |
Setting “If user not found” to CONTINUE for MAB is essential — it allows unknown MAC addresses to proceed to the redirect phase instead of being rejected outright.
Authorization Policy — Two Rules Required
CWA requires two authorization rules in this exact order:
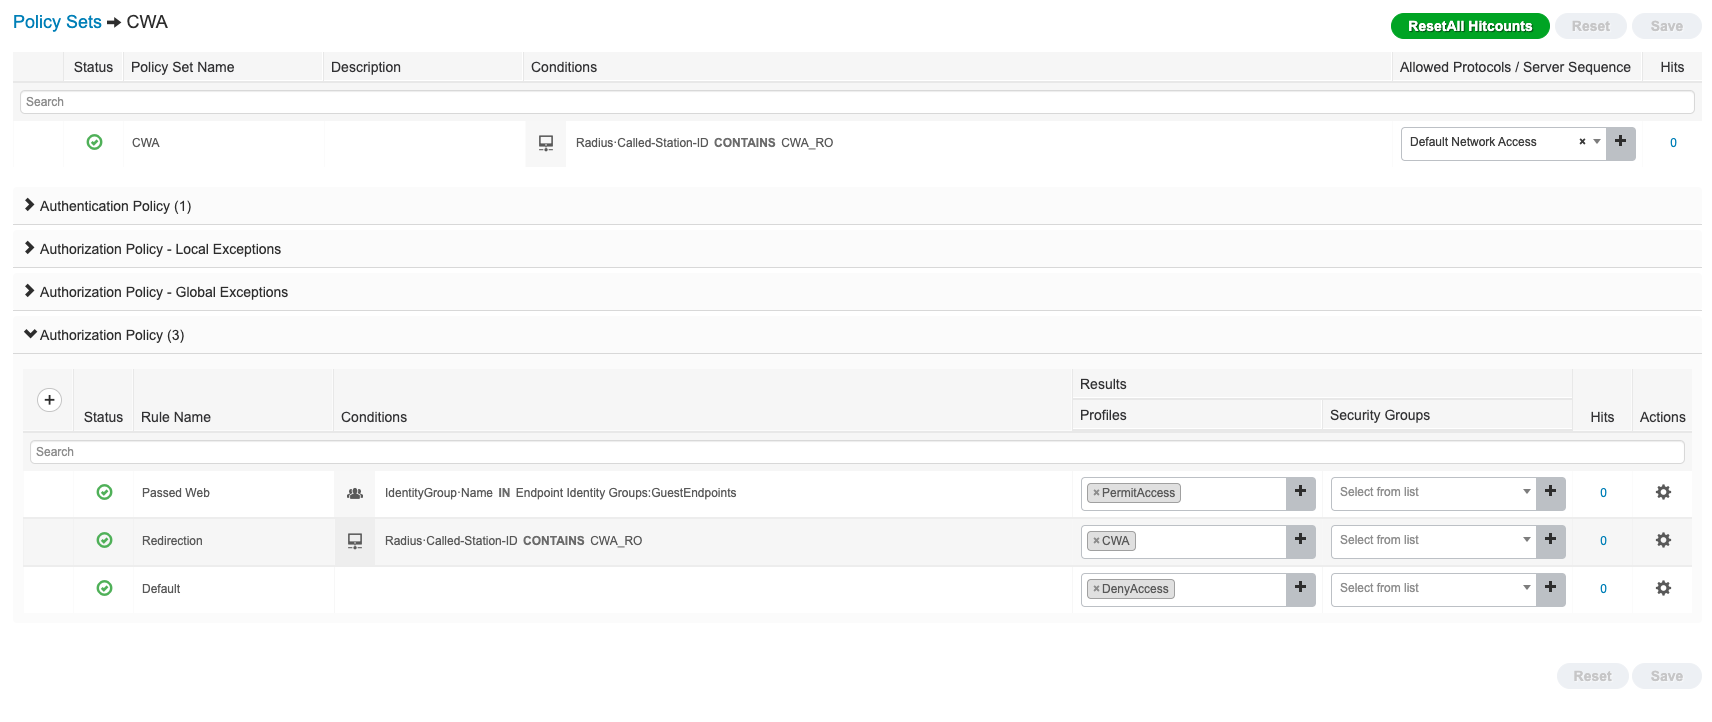
Rule 1 — Redirect (catches unknown clients, sends them to the portal)
| Field | Value |
|---|---|
| Condition | Called-Station-ID ENDS_WITH "Guest-SSID" |
| Result | CWA_Redirect profile |
Rule 2 — Grant Access (hits after successful portal login)
| Field | Value |
|---|---|
| Condition | Endpoint in GuestEndpoints identity group |
| Result | PermitAccess |
Order matters: The redirect rule must come before the default permit/deny rule, or authenticated guests will keep getting redirected.
Step 7: Verify — RADIUS Live Logs
Once configured, go to Operations > RADIUS > Live Logs in ISE.
For every client that connects, you’ll see:
| Column | What to check |
|---|---|
| Identity | Client MAC or username |
| Authentication Policy | Correct policy set matched? |
| Authorization Policy | Correct rule applied? |
| Authorization Result | CWA_Redirect for new clients, PermitAccess after portal login |
| Failure Reason | Root cause if something fails |
A successful CWA flow shows two entries per client:
- First hit →
CWA_Redirect(before portal login) - Second hit (after CoA) →
PermitAccess
Common Issues and Fixes
| Symptom | Likely Cause | Fix |
|---|---|---|
| No RADIUS requests in ISE Live Logs | Firewall blocking UDP 1812 | Open 1812/1813 from Meraki to ISE PSN |
5400 Authentication failed | Shared secret mismatch | Verify secret matches in both ISE and Meraki Dashboard |
| CWA redirect not happening | ISE splash not selected, or walled garden missing ISE IP | Select ISE Authentication in splash, add ISE IP to walled garden |
| Client redirected in a loop | Auth and redirect rules in wrong order | Ensure PermitAccess rule is above the redirect rule |
| CoA not working | UDP 1700 blocked, or CoA not enabled | Open UDP 1700 from ISE to Meraki; enable RADIUS CoA in Dashboard |
| Fast roaming disabled | Expected on CoA-enabled SSIDs | 802.11r/OKC/PMKsa are disabled when CoA is active (except MR 32.1+ with ISE 3.3+) |
| Profiling not working in ISE | Old MR firmware | Upgrade to MR 31.2+ for Device Sensor support |
Cannot locate AAA or Network Device | Device IP not in ISE | Add Meraki device IP to ISE Network Devices, or configure Default Network Device |
Key Port Reference
| Port | Protocol | Direction | Purpose |
|---|---|---|---|
| 1812 | UDP | Meraki → ISE | RADIUS Authentication |
| 1813 | UDP | Meraki → ISE | RADIUS Accounting |
| 1700 | UDP | ISE → Meraki | Change of Authorization (CoA) |
What’s Next
Once the base integration is working, you can layer on:
- Device Posture — ISE checks if endpoints are compliant before granting access
- BYOD Onboarding — Self-service certificate enrollment for personal devices
- Adaptive Policy (SGT) — Cisco TrustSec group tagging for micro-segmentation across Meraki and Catalyst infrastructure
- pxGrid — Share context between ISE and other security tools (FMC, Stealthwatch, etc.)
The Meraki + ISE integration is one of the most powerful access control combinations available in the mid-market. Once the RADIUS plumbing is in place, everything else — posture, profiling, guest lifecycle, dynamic segmentation — builds on top of it.