
There is a moment in every customer meeting where slides stop working. The CISO has seen a hundred vendor decks. The security architect is checking email during your presentation. The energy in the room is flat.
Then you stand up, walk to the whiteboard, and start drawing.
Everything changes. People put down their phones. They start asking questions. They point at the diagram and say “Wait, where does our VPN fit in that model?” Now you are having a conversation, not delivering a presentation.
Zero Trust Architecture is the single most whiteboard-friendly topic in cybersecurity. Every customer has heard of it. Most have a partial or confused understanding of what it actually means. And the five-pillar model lends itself perfectly to a structured, visual explanation that you can adapt to any industry.
This post gives you the exact whiteboard sequence — what to draw first, what to draw next, what to label, and how to adapt it for different verticals. Practice this three times and you will be able to deliver it cold in any customer meeting.
The Zero Trust Mental Model
Before you draw anything, internalize the core principle: implicit trust does not exist. In a traditional network architecture, anything inside the perimeter is trusted. In Zero Trust, nothing is trusted regardless of location. Every access request is authenticated, authorized, and encrypted — whether it originates from corporate HQ, a branch office, or a coffee shop.
Zero Trust is not a product. It is an architecture built on five pillars, a policy engine, and continuous verification. Your whiteboard needs to communicate this without turning into a 45-minute lecture.
The 5 Pillars of Zero Trust
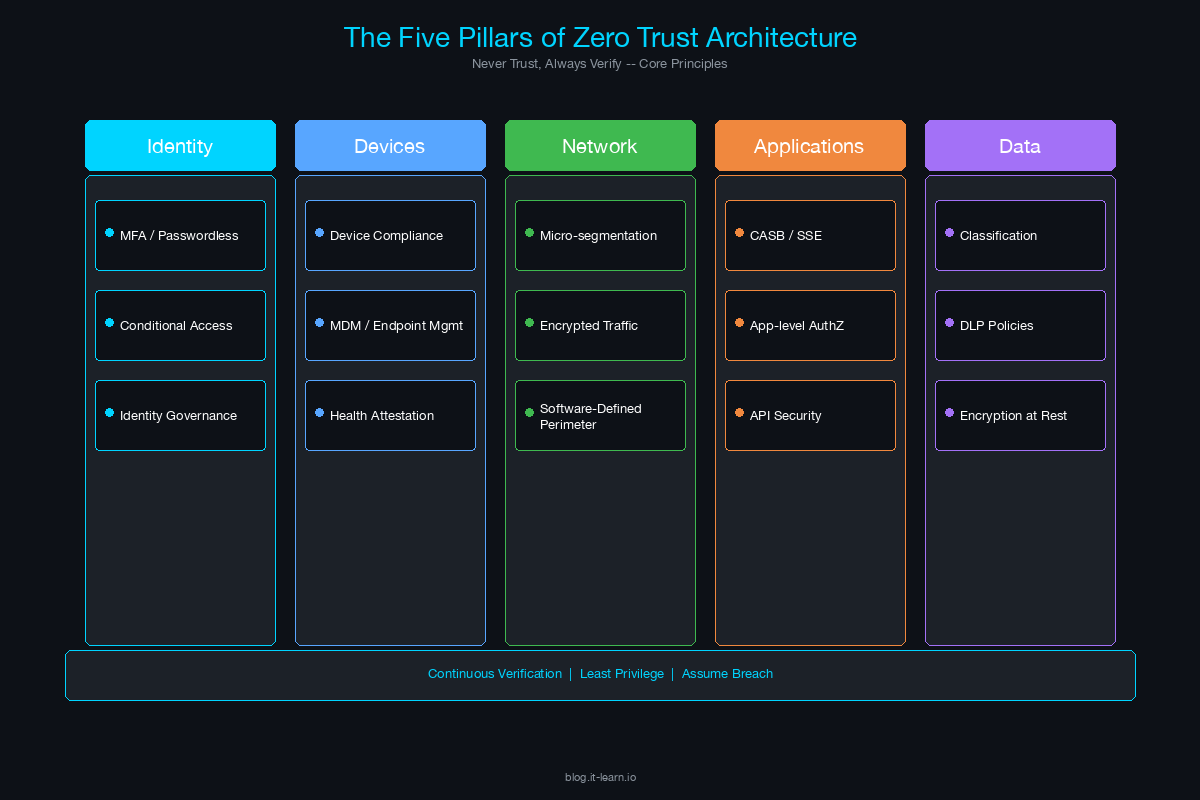
These five pillars form the foundation of every Zero Trust architecture. They are the building blocks of your whiteboard diagram.
| Pillar | What It Covers | Key Technologies | Customer Question It Answers |
|---|---|---|---|
| Identity | Users, service accounts, API identities | MFA, SSO, identity governance, PAM, conditional access | “How do we verify who is accessing our systems?” |
| Device | Endpoints, mobile devices, IoT | EDR, MDM, device posture checks, certificate-based auth | “How do we ensure the device connecting is healthy and managed?” |
| Network | Micro-segmentation, east-west traffic, encryption | ZTNA, micro-segmentation, encrypted tunnels, SDP | “How do we prevent lateral movement once someone is on the network?” |
| Application | App access, API security, workload protection | CASB, CWPP, API gateways, app-level authentication | “How do we secure access to applications without a VPN?” |
| Data | Classification, encryption, DLP, access controls | DLP, encryption at rest/in transit, data classification, rights management | “How do we protect the data itself, regardless of where it lives?” |
The Whiteboard Sequence: Step by Step
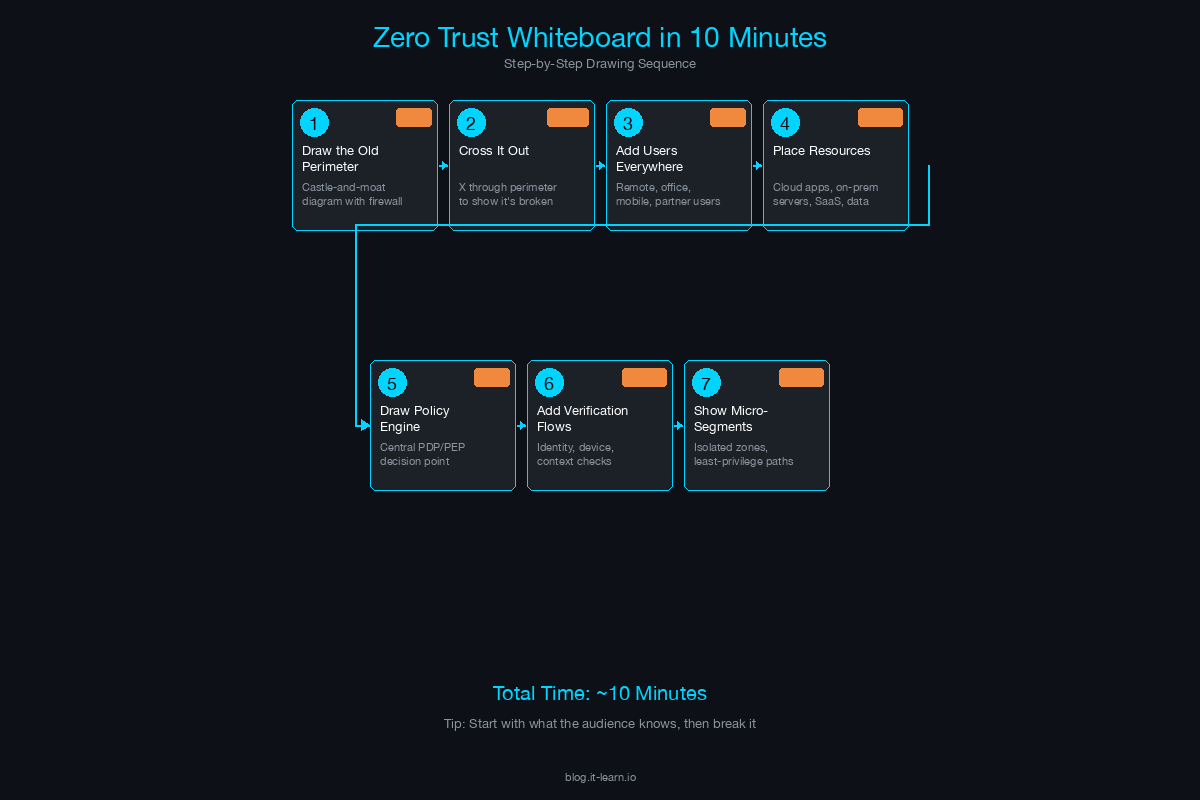
Here is the exact sequence. Practice drawing this until you can do it while talking naturally.
Step 1: Draw the User (30 seconds)
Start on the left side of the whiteboard. Draw a stick figure or a simple person icon. Label it “User”.
Say: “Everything starts with someone trying to access something. In a Zero Trust model, we don’t assume anything about this user just because they’re on our network.”
Step 2: Draw the Device (30 seconds)
Next to the user, draw a laptop or device icon. Label it “Device”.
Say: “The user is on a device. Before we grant access, we need to verify both — is this a legitimate user AND is this a healthy, managed device? If either check fails, access is denied or restricted.”
Step 3: Draw the Policy Engine (60 seconds)
In the center of the whiteboard, draw a large box or diamond. Label it “Policy Engine / PDP” (Policy Decision Point).
This is the brain of Zero Trust. Draw arrows from the User and Device pointing into the Policy Engine.
Say: “Every access request flows through a Policy Engine. This is where the decision is made — allow, deny, or step up authentication. The policy engine evaluates identity, device posture, location, time of day, sensitivity of the resource, and risk signals. It’s the single point of decision.”
Step 4: Draw the Resources (60 seconds)
On the right side of the whiteboard, draw three boxes stacked vertically:
- Network (internal network segments)
- Applications (SaaS, internal apps)
- Data (databases, file shares, cloud storage)
Draw an arrow from the Policy Engine to each resource, but draw a gate or lock icon on each arrow. Label each gate “PEP” (Policy Enforcement Point).
Say: “The policy engine makes the decision, but enforcement happens at the resource level. Each of these enforcement points — whether it’s a ZTNA connector, a micro-segmentation firewall, or a CASB — only grants access after the policy engine approves. There’s no broad network access. Access is per-resource, per-session.”
Step 5: Add Continuous Verification (60 seconds)
Draw a circular arrow around the entire diagram — from User through Policy Engine to Resources and back. Label it “Continuous Monitoring & Verification”.
Say: “This is what separates Zero Trust from just having good access controls. Verification doesn’t happen once at login — it’s continuous. If a device goes out of compliance mid-session, access is revoked. If user behavior becomes anomalous, the session is terminated or stepped up. This is the real-time feedback loop.”
Step 6: Add Signal Inputs (90 seconds)
Below the Policy Engine, draw three smaller boxes feeding into it:
- Threat Intelligence — external threat feeds, known IOCs
- SIEM/XDR — correlated security events, behavioral analytics
- Identity Provider — authentication state, risk score, group membership
Draw arrows from each box up into the Policy Engine.
Say: “The policy engine doesn’t operate in a vacuum. It consumes signals from your threat intelligence, your SIEM or XDR, and your identity provider. The richer the signal data, the better the access decisions. This is where your existing security investments plug into the architecture.”
Step 7: Label and Summarize (60 seconds)
Step back from the whiteboard. Point to each component as you summarize.
Say: “So here’s the full picture. User plus device, verified continuously. Every access request flows through a policy engine that evaluates risk in real-time. Access is granted per-resource, not per-network. And signals from your entire security stack feed the decision. That’s Zero Trust.”
Total drawing time: approximately 6-7 minutes. The remaining 3-4 minutes are for questions and discussion.
Adapting the Diagram for Verticals
The core diagram stays the same. What changes is the emphasis and the specific examples you use when explaining each component.
Healthcare
- Identity emphasis: Clinical staff sharing workstations (kiosk scenarios), nurse badge-tap authentication, third-party vendor access for medical device maintenance.
- Device emphasis: Medical devices (IoMT) that cannot run endpoint agents — infusion pumps, imaging systems, patient monitors. These require network-level segmentation because device-level controls are not possible.
- Data emphasis: PHI (Protected Health Information) under HIPAA. Data classification and DLP become critical. “If a doctor accesses a patient record from a personal device in a coffee shop, your Zero Trust policy needs to handle that scenario.”
- Draw this addition: Add a “Medical Device” icon below the Device box with a note: “Can’t install agents — network segmentation required.”
Financial Services
- Identity emphasis: Privileged access to trading systems, regulatory requirements for separation of duties, third-party auditor access.
- Network emphasis: Micro-segmentation between trading, retail banking, and back-office systems. Regulatory requirements (FFIEC, PCI DSS) mandate network segmentation.
- Data emphasis: Transaction data, customer PII, and regulatory reporting data each have different classification levels and access policies.
- Draw this addition: Add compliance logos (PCI, SOX, GLBA) next to the Policy Engine with a note: “Policy must enforce regulatory controls.”
Manufacturing / OT
- Network emphasis: IT/OT convergence. The Purdue Model is the traditional segmentation approach, but Zero Trust extends it by verifying every access request between IT and OT zones.
- Device emphasis: PLCs, SCADA systems, HMIs — devices with 15-20 year lifecycles that run legacy operating systems and cannot be patched or agented.
- Draw this addition: Draw a horizontal line across the middle of the whiteboard. Label the top “IT” and the bottom “OT.” Show the Policy Engine spanning both zones. “Zero Trust for OT doesn’t mean putting agents on PLCs — it means controlling and monitoring every connection that crosses this boundary.”
Tying ZTA to Vendor Products Without Being Salesy
The whiteboard diagram you just drew is vendor-neutral. That is intentional. Here is how to naturally introduce your products:
After completing the diagram, say: “So this is the architecture. Now, where does [your product] fit? Let me highlight the components we cover.”
Then circle or highlight the specific components on the whiteboard that your product addresses. If you sell an identity solution, circle Identity and the Policy Engine. If you sell a network security product, circle Network and the PEP enforcement points.
Key rules:
Always show the full architecture first. Never draw a diagram that only includes your product. Customers see through it immediately.
Acknowledge what you don’t cover. “We handle identity verification and policy enforcement. For endpoint posture checking, you’d want an EDR — we integrate with CrowdStrike, SentinelOne, and Microsoft Defender for Endpoint.”
Use the whiteboard to identify gaps. “Looking at this diagram against your current stack — where do you feel you have the biggest gap?” This is a discovery question disguised as an architectural discussion.
Let the customer draw on the whiteboard. Hand them a marker. “Where would you place your existing tools on this diagram?” Now they are designing their Zero Trust architecture with you. This is collaborative selling at its most effective.
Handling Common Customer Questions on the Whiteboard
These questions will come up. Be ready for them.
“We already have a VPN. Isn’t that good enough?”
Draw the VPN as a wide funnel connecting the User directly to all resources. Then draw the Zero Trust model next to it — narrow, per-resource access through the Policy Engine. “A VPN gives broad network access. Once you’re on the VPN, you can reach everything the network allows. Zero Trust replaces that with per-resource access — the user only reaches the specific application they’re authorized for, and only while their device is compliant.”
“How is this different from micro-segmentation?”
Point to the Network box in your diagram. “Micro-segmentation is one component of Zero Trust — it’s the Network pillar. Zero Trust also includes identity verification, device posture, application-level controls, and data protection. Micro-segmentation alone doesn’t verify the user or the device.”
“This sounds expensive. Where do we start?”
Circle Identity on the whiteboard. “Start here. MFA and conditional access policies give you the highest security impact for the lowest cost. Then add device posture checking. Then micro-segmentation. Zero Trust is a journey, not a forklift upgrade. Most organizations take 18-36 months to mature across all five pillars.”
“What about our legacy applications that don’t support modern auth?”
Draw a small box labeled “Legacy App” and connect it through an “App Proxy” or “ZTNA Connector” to the Policy Engine. “Legacy apps that only support Kerberos or NTLM can be fronted by a ZTNA connector or application proxy that handles modern authentication on their behalf. The user authenticates with MFA to the proxy, and the proxy translates that into the legacy auth protocol.”
“Does Zero Trust mean we eliminate the firewall?”
“No. Firewalls still have a role — they enforce network-level policy at enforcement points. What changes is that the firewall is no longer the sole trust boundary. It becomes one of many enforcement points, all governed by the central policy engine.”
Practice Drill
Before your next customer meeting, do this:
- Stand in front of a whiteboard (or a blank sheet of paper).
- Set a timer for 10 minutes.
- Draw the full Zero Trust diagram from memory while explaining it out loud.
- Repeat until you can do it without pausing to think about what comes next.
The goal is not perfection — it is fluency. The whiteboard should feel like a natural extension of your conversation, not a rehearsed performance. When you can draw and talk simultaneously without losing your train of thought, you are ready.
The SE who can stand up, walk to the whiteboard, and draw a coherent Zero Trust architecture from scratch — while fielding questions and adapting to the customer’s environment — is the SE who earns the room’s respect. No slide deck can compete with that.
Related Posts in This Series
- Network Segmentation Pitch — Deep dive into the segmentation layer that underpins every Zero Trust whiteboard
- Secure Campus Network Reference Architecture — The full reference design for a Zero Trust campus network
- How to Position SASE to a CISO — Extend the Zero Trust conversation to remote users and cloud workloads
- Security Compliance Cheat Sheet: NIST, ISO 27001, SOC 2, PCI DSS — Map your Zero Trust architecture to the compliance frameworks customers care about
- Secure Remote Access: VPN vs ZTNA vs SASE — Compare remote access approaches through a Zero Trust lens
Practice with free flashcards, quizzes, and hands-on lab scenarios at cciesec.it-learn.io — built specifically for the CCIE Security v6.1 written (350-701 SCOR) and lab exam.


