
The POC is the most important milestone in a Cisco ISE deal. It is where the technology proves itself in the customer’s environment — or does not. A well-run POC builds confidence, surfaces real-world requirements, and creates momentum toward a purchase decision. A poorly run POC — one plagued by certificate errors, switch compatibility issues, and scope creep — kills deals and damages your credibility.
This guide gives you the complete playbook for running a 30-day Cisco ISE POC: how to scope it, what to include and exclude, the week-by-week timeline, the gotchas that will trip you up, and how to present results that convert POC success into a production deal.
POC Scoping: What to Include and What to Exclude
The most common POC failure is scope creep. The customer wants to test everything — 802.1X, guest portals, posture, BYOD, TrustSec, pxGrid integration, and TACACS+ device administration — all in 30 days. That is not a POC. That is a deployment without a purchase order.
What to Include in a 30-Day POC
Core authentication: 802.1X for managed endpoints (Windows, macOS) using EAP-TLS or PEAP. MAB (MAC Authentication Bypass) for devices that cannot do 802.1X — printers, IP phones, IoT devices, and building automation systems.
Device profiling: ISE’s profiling engine using RADIUS, DHCP, DNS, HTTP, SNMP, and NetFlow probes. The goal is a complete device inventory with classification by type, manufacturer, and OS.
Basic authorization policies: Assigning devices to VLANs or downloadable ACLs based on identity, device type, and authentication method. At minimum: corporate devices get full access, unknown devices get limited access, and failed authentication gets quarantine.
Guest portal: Self-service guest registration with sponsor approval or self-registration. Time-limited access on an isolated guest VLAN. This is a high-visibility feature that non-technical stakeholders can see and evaluate.
Basic posture assessment: One or two posture checks — antivirus presence and OS patch level are standard. Demonstrate the compliant/non-compliant/unknown flow with authorization policy changes based on posture state.
Monitoring and reporting: ISE dashboard, RADIUS live logs, and device profiling reports. Show the customer what visibility they gain from day one.
What to Exclude from a 30-Day POC
Full TrustSec/SGT deployment. Security Group Tags require switch and firewall support, SGT propagation configuration, and policy design. This is a Phase 2 or Phase 3 production activity, not a POC feature.
pxGrid integrations. Integrating ISE with third-party tools (SIEM, SOAR, firewalls, vulnerability scanners) via pxGrid is valuable but adds complexity and dependencies that extend the POC timeline.
TACACS+ device administration. While ISE handles TACACS+ for network device management, mixing NAC and device administration in a single POC dilutes focus. Keep the POC focused on endpoint access control.
All sites and all switch stacks. Scope the POC to one site, one building, or one floor. A representative sample of 50-200 endpoints is sufficient to validate the technology. Full-site deployment is a production activity.
Complex certificate infrastructure. If the customer does not have PKI in place, do not build one during the POC. Use PEAP (username/password) for the POC and plan EAP-TLS deployment as part of the production project.
The Scoping Conversation
Before the POC begins, have a formal scoping meeting with the customer’s network, security, and IT operations teams. Document and agree on:
- POC location: Which building, floor, or VLAN?
- Endpoint count: How many devices will be in scope?
- Device types: What mix of managed endpoints, phones, printers, and IoT devices?
- Switch inventory: Make and model of switches in the POC scope, with current firmware versions
- Wireless controller: Type, firmware, and current authentication method
- Active Directory: Domain structure, service account requirements, and DNS configuration
- Certificate authority: Existing PKI or need for ISE self-signed certificates during POC
- Success criteria: What does the customer need to see to call the POC successful?
- Timeline: Start date, weekly checkpoints, and final presentation date
- Resources: Who from the customer’s team is available, and for how many hours per week?
Lab vs. Production POC: The Tradeoffs
Every POC starts with this question: do we run it in a lab or in production?
Lab POC
Advantages:
- Zero risk to production traffic
- Full control over the environment
- Faster setup (no change management process)
- Can test destructive scenarios (block all traffic, simulate failures)
Disadvantages:
- Does not prove the solution works with the customer’s real infrastructure
- Synthetic device population does not represent actual device diversity
- Switch behavior in lab does not reflect production firmware, configuration, or load
- Active Directory integration in lab does not surface production DNS or firewall issues
- Customer stakeholders are less impressed by lab results
Scoped Production POC
Advantages:
- Real devices, real switches, real Active Directory, real user experience
- Profiling data reflects actual device population (the “surprise devices” that sell the deal)
- Stakeholders can see the solution working in their own environment
- Issues surfaced during POC are issues that would arise during production deployment — better to find them now
Disadvantages:
- Requires change management approval
- Risk of impacting production traffic if misconfigured
- Customer network team must be involved (resource commitment)
- More complex troubleshooting when issues arise
Recommended Approach: Scoped Production in Monitor Mode
Deploy ISE in the customer’s production environment but in monitor mode only. This means:
- ISE receives RADIUS authentication requests from switches and wireless controllers
- ISE authenticates devices and logs the results
- ISE profiles every device and builds the device inventory
- ISE does not enforce authorization policies — no devices are blocked, re-VLANed, or restricted
- All traffic continues to flow normally regardless of authentication result
Monitor mode gives you real-world data with zero production impact. The device inventory alone is usually the most compelling POC deliverable — customers are consistently surprised by the number and variety of devices on their network that they did not know about.
The 4-Week POC Timeline
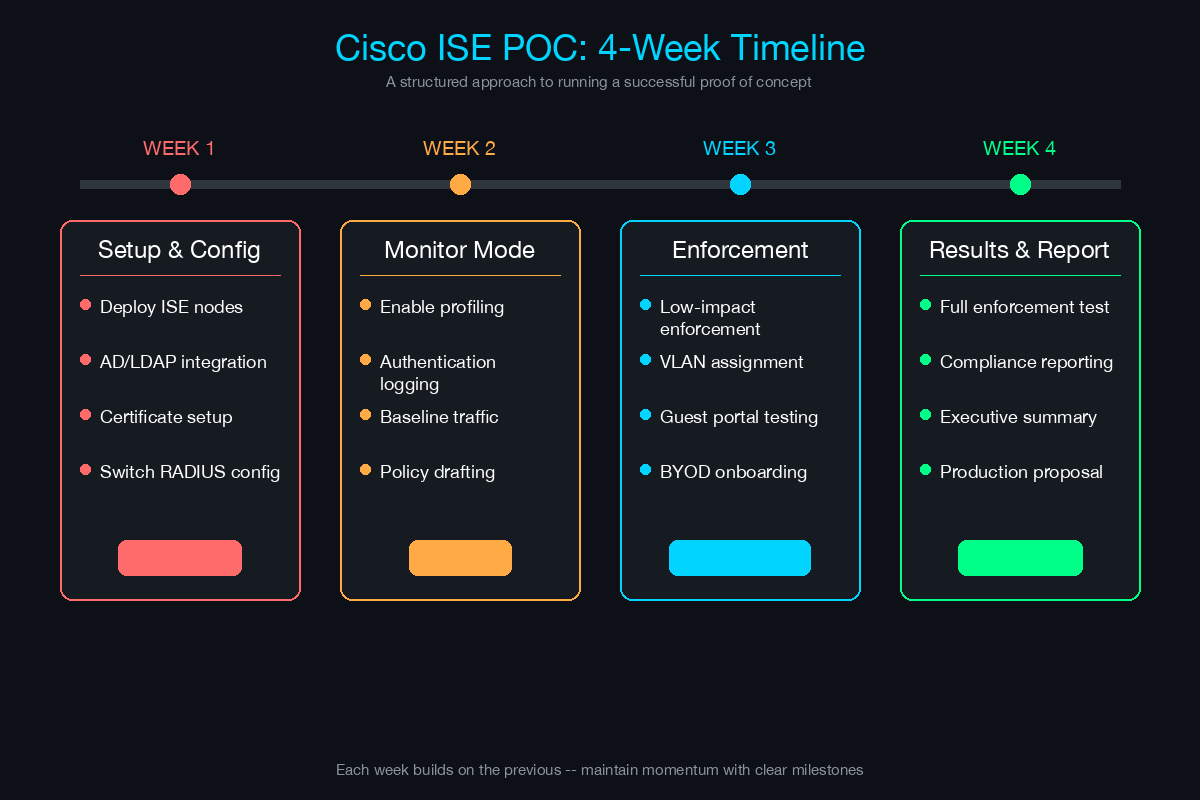
Week 1: Deploy and Integrate
Day 1-2: ISE Infrastructure
- Deploy ISE virtual machines (or activate evaluation appliances)
- Minimum topology: one Policy Administration Node (PAN) + one Policy Service Node (PSN), or a standalone node for smaller POCs
- Configure ISE base settings: hostname, DNS, NTP, system certificates
- Verify ISE admin portal access and initial setup wizard completion
Day 3-4: Active Directory Integration
- Join ISE to the customer’s Active Directory domain
- Configure the AD service account with appropriate permissions
- Test AD connectivity: LDAP queries, group retrieval, user authentication
- Verify DNS resolution from ISE to AD domain controllers (both forward and reverse)
- Confirm NTP synchronization between ISE and AD (Kerberos requires time within 5 minutes)
Day 5: Network Device Configuration
- Add switches and wireless controllers as RADIUS clients in ISE
- Configure RADIUS shared secrets (use strong, unique secrets per device or device group)
- Configure switches for 802.1X and MAB on POC ports
- Enable RADIUS accounting on network devices
- Verify RADIUS connectivity: test authentication from a single port
Week 1 Checkpoint: ISE is online, joined to AD, and receiving RADIUS requests from at least one switch. First successful authentication logged.
Week 2: Basic Authentication
Day 6-7: 802.1X Configuration
- Configure ISE authentication policies for 802.1X (EAP-PEAP or EAP-TLS)
- Configure supplicant settings on managed Windows and macOS endpoints
- Test authentication with managed devices: verify successful RADIUS authentication in ISE Live Logs
- Troubleshoot any EAP failures (certificate trust, supplicant misconfiguration, RADIUS timeouts)
Day 8-9: MAB Configuration
- Configure MAB for non-802.1X devices (printers, IP phones, IoT)
- Add known MAC addresses to ISE endpoint identity groups or use profiling for dynamic classification
- Configure switch ports for MAB fallback (802.1X first, fallback to MAB after timeout)
- Verify MAB authentication for printers, phones, and other non-supplicant devices
Day 10: Authorization Policies (Monitor Mode)
- Create authorization policies that assign results based on identity and device type
- Corporate managed devices: log “full access” authorization result (but do not enforce)
- Unknown devices: log “limited access” authorization result
- Failed authentication: log “quarantine” result
- All policies in monitor mode — no actual VLAN changes or ACL enforcement
- Review ISE RADIUS Live Logs to verify policy matching
Week 2 Checkpoint: 802.1X and MAB are authenticating successfully. Authorization policies are matching correctly in logs. No production impact.
Week 3: Advanced Policies
Day 11-12: Device Profiling
- Enable profiling probes: RADIUS, DHCP, DNS, HTTP, SNMP
- Allow 24-48 hours for profiling data to populate
- Review the ISE Context Visibility page for device inventory
- Identify devices that are profiled incorrectly or not profiled at all
- Create custom profiling rules for devices that do not match built-in profiles
- Document the device inventory: total count by type, manufacturer, OS, and managed/unmanaged status
Day 13: Guest Portal
- Configure the ISE guest portal (self-registration or sponsored)
- Create a guest SSID on the wireless controller
- Test the guest workflow: connect to guest SSID, redirect to portal, register, receive time-limited access
- Customize the portal branding with the customer’s logo (small touch that makes a big impression)
- Verify guest session expiration and access isolation
Day 14: Posture Assessment
- Configure ISE posture conditions: antivirus presence, OS patch level
- Configure client provisioning policy for AnyConnect Posture module
- Test posture flow: endpoint connects, receives AnyConnect, runs posture check, reports compliant/non-compliant
- Verify authorization policy changes based on posture status (in monitor mode)
- Document the posture workflow end-to-end
Day 15: Edge Cases and Exceptions
- Test devices that presented issues during Weeks 1-2
- Document any devices requiring exceptions or custom policies
- Verify failover: shut down one ISE node, confirm authentication continues via surviving node
- Test RADIUS Change of Authorization (CoA) — pushing a session update to a switch after posture result changes
Week 3 Checkpoint: Device profiling complete with inventory report. Guest portal operational. Posture assessment functional. Edge cases documented.
Week 4: Reporting and Results
Day 16-17: Data Collection
- Export ISE reports: authentication summary, profiling summary, posture compliance, guest sessions
- Compile device inventory statistics: total devices discovered, managed vs. unmanaged, by type and OS
- Calculate authentication success rate (target: 95%+ for managed devices)
- Document all issues encountered and their resolutions
- Capture screenshots of key ISE dashboard views
Day 18-19: Results Presentation Preparation
- Build the POC results presentation (template below)
- Map POC findings to business case metrics
- Prepare the production deployment proposal
- Practice the presentation with your account manager
Day 20: Executive Presentation
- Present POC results to the combined technical and executive audience
- Walk through findings, success criteria results, and device inventory
- Present the production deployment proposal and timeline
- Define next steps and decision timeline
Week 4 Checkpoint: POC results documented. Executive presentation delivered. Production proposal submitted. Next steps agreed upon.
Common Gotchas (and How to Fix Them)
These issues appear in the majority of ISE POCs. Knowing about them in advance lets you troubleshoot faster and maintain credibility with the customer.
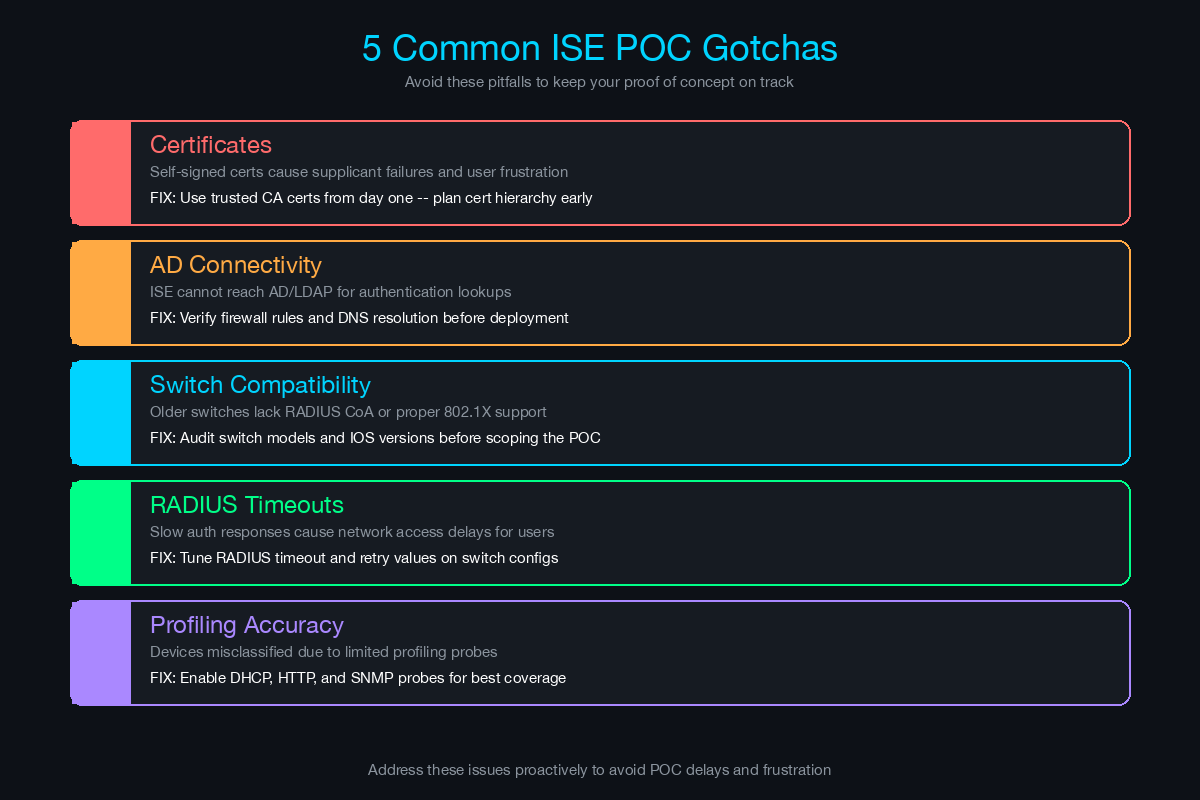
Gotcha 1: Certificate Issues
Symptoms: EAP-TLS authentication fails. Supplicants reject the ISE server certificate. ISE rejects client certificates. Users see “certificate not trusted” warnings.
Root causes:
- ISE’s server certificate is self-signed and not trusted by endpoints
- The customer’s CA certificate is not imported into ISE’s Trusted Certificates store
- Intermediate CA certificates are missing from the certificate chain
- Certificates have expired (check ISE, client, and CA certificates)
- Subject Alternative Name (SAN) does not match the ISE hostname
Prevention:
- Verify the certificate chain before the POC starts: root CA, intermediate CA, and ISE server certificate
- Import the customer’s root and intermediate CA certificates into ISE Trusted Certificates
- If using the customer’s CA to sign the ISE server certificate, do this in Week 1 Day 1 — certificate requests often take days to process
- For POC simplicity, use PEAP (username/password) instead of EAP-TLS. Deploy EAP-TLS in production.
Quick diagnostic:
- ISE: Operations > RADIUS > Live Logs — look for “SSL handshake failed” or “certificate validation failed”
- Endpoint: check the supplicant logs for certificate trust errors
- Verify certificate dates:
openssl x509 -in cert.pem -noout -dates
Gotcha 2: Active Directory Connectivity
Symptoms: ISE cannot join the AD domain. User authentication fails with “identity resolution failed.” Group-based policies do not match because ISE cannot retrieve group membership.
Root causes:
- DNS resolution failure — ISE cannot resolve AD domain controller hostnames
- NTP time skew — Kerberos authentication requires time synchronized within 5 minutes
- Firewall rules blocking LDAP (TCP 389/636), Kerberos (TCP/UDP 88), DNS (TCP/UDP 53), or MSRPC (TCP 135, 49152-65535)
- AD service account locked out or password expired
- ISE using a different DNS server than the one that has AD SRV records
Prevention:
- Test DNS resolution from ISE CLI:
nslookup domain.localfrom ISE console - Verify NTP:
show ntpon ISE CLI — confirm it matches AD domain controller time - Request firewall rule openings before the POC starts (provide a port matrix to the customer’s firewall team)
- Use a dedicated service account with a non-expiring password and failed-login lockout exclusion
- Configure ISE to use the same DNS servers as domain-joined endpoints
Quick diagnostic:
- ISE CLI:
show application status iseto verify services are running - ISE admin: Administration > Identity Management > External Identity Sources > Active Directory — run diagnostic tests
- Check ISE ise-psc.log for detailed AD join/query errors
Gotcha 3: Switch Compatibility
Symptoms: 802.1X does not work on certain switch models. CoA (Change of Authorization) fails — ISE sends a session update but the switch ignores it. MAB does not fall back correctly. Multi-auth or multi-domain modes behave unexpectedly.
Root causes:
- Switch firmware does not support the required 802.1X features
- CoA requires specific IOS/IOS-XE commands that are not configured or not supported on older firmware
- Switch port mode (single-host, multi-host, multi-domain, multi-auth) is incorrect for the deployment scenario
- RADIUS dead server detection is too aggressive — ISE is marked as dead after a single timeout
- Authentication timer values are too short for ISE processing time
Prevention:
- Collect switch inventory (make, model, firmware version) during scoping
- Check Cisco ISE compatibility matrix for supported switch platforms and minimum firmware versions
- Deploy recommended switch configurations from the ISE deployment guide — do not improvise
- Configure reasonable RADIUS timeouts (30 seconds minimum) and dead-criteria thresholds
Recommended switch port configuration (IOS-XE):
interface GigabitEthernet1/0/1
 switchport mode access
 authentication host-mode multi-auth
 authentication order dot1x mab
 authentication priority dot1x mab
 authentication port-control auto
 authentication periodic
 authentication timer reauthenticate server
 mab
 dot1x pae authenticator
 dot1x timeout tx-period 10
 spanning-tree portfast
Gotcha 4: RADIUS Timeouts
Symptoms: Authentication works with a few devices but fails under load. Switches report RADIUS server unreachable. ISE shows successful authentication in logs but the switch has already timed out and denied access.
Root causes:
- Default RADIUS timeout on most switches is 5 seconds — ISE may take longer to process authentication, especially when querying AD, running posture checks, or evaluating complex policies
- ISE PSN node is overloaded (CPU or memory) — unlikely in a POC but possible if the POC scope is too large
- Network latency between switches and ISE (especially across WAN links)
- RADIUS retransmit count is too low — switch gives up after one failed attempt
Prevention:
- Set RADIUS timeout to 30 seconds on switches:
radius-server timeout 30 - Set RADIUS retransmit to 3:
radius-server retransmit 3 - Configure RADIUS dead-criteria with reasonable thresholds:
radius-server dead-criteria time 60 tries 5 - Monitor ISE PSN performance during the POC: Administration > System > Dashboard
- If using WAN links, deploy a PSN local to the POC site
Gotcha 5: Device Profiling Accuracy
Symptoms: Devices are classified as “Unknown” or misclassified. Printers show up as workstations. IP phones are classified as generic Cisco devices without specific model identification.
Root causes:
- Not all profiling probes are enabled — DHCP and HTTP probes are often the most valuable for IoT and printer classification
- SNMP probe requires SNMP credentials for network devices — without them, ISE cannot poll device details
- Custom devices (medical equipment, building automation, industrial IoT) do not match any built-in profile
- Profiling takes time — results improve over 24-48 hours as ISE collects more data from multiple probes
Prevention:
- Enable all relevant profiling probes: RADIUS (always on), DHCP (configure DHCP relay to ISE), DNS, HTTP, SNMP (if credentials available), NetFlow
- Allow 48 hours after enabling probes before evaluating profiling accuracy
- Create custom profiling rules for devices unique to the customer’s environment
- Use ISE’s profiling feed service to download the latest profiling definitions from Cisco
Defining Success Criteria Upfront
Never start a POC without written success criteria. Without them, the customer can always find a reason to say “we need to test more.” With them, the POC has a clear pass/fail outcome that drives a decision.
Functional Success Criteria
| Criteria | Target | How to Measure |
|---|---|---|
| 802.1X authentication success rate | 95%+ of managed devices | ISE RADIUS Live Logs |
| MAB authentication success rate | 90%+ of profiled devices | ISE RADIUS Live Logs |
| Device profiling accuracy | 80%+ correctly classified | ISE Context Visibility |
| Guest portal functionality | Successful self-service registration and access | End-to-end walkthrough |
| Posture assessment | Correct compliant/non-compliant classification | ISE Posture Live Logs |
| Policy matching | Authorization rules match expected outcomes | ISE policy trace |
Operational Success Criteria
| Criteria | Target | How to Measure |
|---|---|---|
| Authentication latency | Under 2 seconds (average) | ISE performance metrics |
| ISE availability | 99.9% uptime during POC | ISE system health dashboard |
| Failover | Sub-30 second recovery | Controlled failover test |
| No production impact | Zero user-reported connectivity issues | Help desk tickets |
Business Success Criteria
| Criteria | Target | How to Measure |
|---|---|---|
| Device inventory completeness | All connected devices discovered | ISE profiling report |
| Unknown device discovery | Document devices not in CMDB | Compare ISE inventory to CMDB |
| Compliance reporting | Audit-ready access control documentation | ISE reports export |
| Stakeholder sign-off | Technical and executive approval | Sign-off meeting |
Structuring the POC Results Presentation
The results presentation is where the POC converts to a deal — or does not. Structure it for a mixed audience of technical and executive stakeholders.
Slide 1: POC Overview
- Scope: which site, how many devices, which features tested
- Timeline: start and end dates
- Resources involved: customer team and vendor team
Slide 2: Device Discovery Results
This is usually the most compelling slide. Show:
- Total devices discovered vs. CMDB records (the gap is the selling point)
- Breakdown by device type: managed endpoints, printers, IP phones, IoT, unknown
- Pie chart or bar chart of device categories
- Highlight surprising findings: “We discovered 47 devices not in your inventory, including 12 personal devices and 3 unauthorized wireless access points”
Slide 3: Authentication Results
- 802.1X success rate for managed devices
- MAB success rate for non-supplicant devices
- Authentication failures: root cause analysis and resolution
- Average authentication latency
Slide 4: Policy Enforcement (Monitor Mode)
- Authorization policy matching summary
- What would have happened if enforcement were enabled: X devices would have received full access, Y would have been limited, Z would have been quarantined
- Guest portal usage statistics
- Posture assessment results: compliant vs. non-compliant endpoints
Slide 5: Issues and Resolutions
- Document every issue encountered during the POC
- For each: root cause, resolution, and applicability to production deployment
- This builds credibility — hiding issues damages trust
- Frame issues as “items we resolved” rather than “problems we encountered”
Slide 6: Success Criteria Results
- Present each success criterion with pass/fail status
- Highlight criteria that exceeded expectations
- For any criteria not met, explain why and what changes would address it in production
Slide 7: Production Deployment Proposal
- Recommended architecture: number of ISE nodes, deployment topology
- Phased deployment timeline: monitor mode, authentication enforcement, authorization enforcement
- Licensing recommendation: Base, Plus, or Advantage based on POC findings
- Professional services scope and estimate
- Total cost of ownership over three years
Slide 8: Next Steps
- Decision timeline
- Procurement process and key contacts
- Production deployment kickoff target date
Converting POC to Production Deal
The gap between a successful POC and a signed purchase order is where many deals stall. Close the gap with these practices.
Present results within one week of POC completion. Momentum decays rapidly. Every week between POC end and results presentation reduces the probability of conversion.
Invite both technical and executive stakeholders. The technical team validates the results. The executive sponsors the budget. If either is absent, the decision is deferred.
Lead with device discovery data. The most common reaction to ISE profiling data is “I had no idea we had that many devices on our network.” That reaction is the emotional catalyst for the purchase decision. Unknown devices represent unmanaged risk, and the POC just proved the risk is real.
Provide a written proposal the same day as the presentation. Do not say “I will send you a proposal next week.” Have it ready. The customer is most engaged immediately after seeing the results.
Define a clear decision timeline. Ask directly: “Based on what you have seen, what do you need to move forward, and by when can we expect a decision?” Document the answer and hold the customer to it in follow-up conversations.
Offer to leave ISE running in monitor mode. If the customer needs more time to decide, offer to keep the POC environment active in monitor mode. This provides ongoing visibility value and keeps ISE top-of-mind. It also creates inertia — the longer ISE is running, the harder it is to turn off.
Address the monitor-to-enforcement path. The biggest customer fear is enforcement — the moment ISE starts blocking devices. Explain the phased approach: monitor mode for 30-60 days in production, low-impact enforcement (logging only) for 30 days, then gradual enforcement with exception handling. Nobody gets blocked on day one.
POC Planning Checklist
Use this checklist for every Cisco ISE POC:
Pre-POC (1-2 weeks before):
- Conduct formal scoping meeting with customer technical team
- Document success criteria and get written agreement
- Collect switch inventory (make, model, firmware) for POC scope
- Verify Active Directory access: service account, DNS, NTP, firewall rules
- Confirm ISE VM resources are provisioned (or evaluation appliances ordered)
- Request certificate from customer’s CA for ISE server certificate (if using customer PKI)
- Schedule weekly checkpoint meetings with customer stakeholders
- Confirm customer resource availability for the POC duration
During POC (4 weeks):
- Week 1: ISE deployed, AD integrated, first RADIUS authentication successful
- Week 2: 802.1X and MAB working, authorization policies matching in logs
- Week 3: Profiling complete, guest portal operational, posture assessment functional
- Week 4: Reports generated, presentation prepared, executive meeting scheduled
- Document all issues and resolutions as they occur
- Send weekly status updates to all stakeholders
Post-POC (1 week after):
- Deliver executive presentation within 5 business days of POC completion
- Provide written production deployment proposal same day as presentation
- Confirm decision timeline and next steps
- Offer to maintain ISE in monitor mode during decision period
- Schedule follow-up meeting within 2 weeks to address questions
A well-run POC is not just a technology validation — it is a trust-building exercise. The customer is evaluating the technology, but they are also evaluating you. How you handle problems, communicate status, and present results tells them what the production deployment experience will be like. Run the POC the way you would run the production project, and the conversion will take care of itself.
Related Posts in This Series
- Cisco ISE vs Aruba ClearPass vs Forescout — Understand the competitive landscape before scoping the ISE POC
- How to Build a Business Case for NAC — Build the business case that gets the POC approved and funded
- Network Segmentation Pitch — Design the segmentation policy the POC will validate
- Secure Campus Network Reference Architecture — See how ISE fits into the full campus security architecture
- How to Run a Technical Discovery Call for Security Deals — Run effective discovery to scope the POC correctly from day one
Practice with free flashcards, quizzes, and hands-on lab scenarios at cciesec.it-learn.io — built specifically for the CCIE Security v6.1 written (350-701 SCOR) and lab exam.


