
The difference between an SE who demonstrates from a slide deck and an SE who demonstrates from a live environment is the difference between telling a customer how something works and showing them. Customers can see a slide deck from any vendor. They cannot get a live, customized demonstration of their exact use case from every vendor — and the SE who can deliver that wins the deal.
A home lab is what makes that possible. It is where you build the demo environments that close deals, practice configurations before customer calls, test interoperability scenarios that are not covered in official documentation, prepare for certifications, and develop the hands-on confidence that customers recognize immediately.
This guide covers how to build a home lab optimized for cybersecurity pre-sales — one that mirrors real customer environments, costs less than $500 to set up, and makes you measurably better at your job.
Why SEs Need a Lab
Before getting into hardware and software, here is specifically what a home lab enables for pre-sales work:
Demo Environment Independence
Your company’s shared demo environment is fine for standard demos. But when a customer asks to see ISE with 802.1X authenticating against their specific Active Directory OU structure, or they want to see how your SIEM correlates syslog from a non-standard source, the shared environment cannot accommodate that. Your home lab can.
Scenario Testing Before Customer Calls
The worst time to discover that a feature does not work as expected is during a live customer demo. Your lab is where you run through every click, every CLI command, and every edge case before the customer ever sees it. If the RADIUS authentication fails in your lab at 10 PM the night before, you have time to fix it. If it fails during the demo, you lose the deal.
Certification Preparation
Every hands-on certification — CCNP Security, CCIE Security, OSCP, AWS Security Specialty — requires lab practice. Candidates who study only from books and videos have significantly lower pass rates than those who practice in lab environments. Your home lab doubles as your certification study environment.
Troubleshooting Skill Development
Customers do not call your SE team when everything is working. They call when something is broken, and they expect you to troubleshoot it or at least understand what went wrong. The only way to develop real troubleshooting skills is to break things intentionally and fix them. Your lab is the safe environment for that.
Hardware Options: Three Approaches
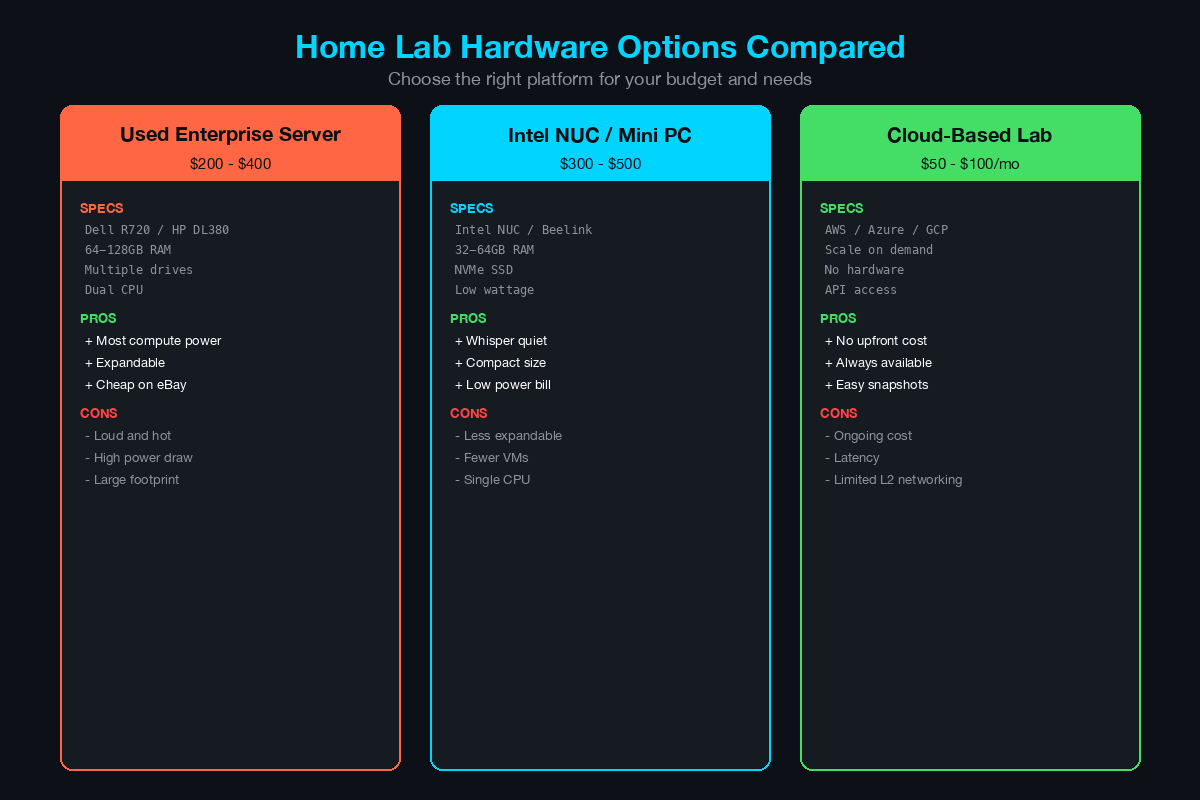
Option A: Used Enterprise Server ($150-$300)
The most cost-effective approach for maximum lab capacity.
Recommended models:
- Dell PowerEdge R720/R730 (commonly available on eBay for $150-$250)
- HP ProLiant DL380 Gen8/Gen9 ($150-$300)
- Lenovo ThinkServer RD650 ($150-$250)
Specifications to look for:
- Dual-socket Xeon E5-2600 series (v2 or v3)
- 64-128GB DDR3/DDR4 ECC RAM (RAM is often sold separately — budget $30-$60 for additional DIMMs)
- 2+ drive bays for SSD storage
- iDRAC/iLO for remote management
Pros: Maximum RAM and CPU for virtualization, enterprise-grade reliability, hot-swap drives, remote management.
Cons: Loud (rack server fans), power-hungry (150-300W idle), physically large. Not practical if your lab space is your bedroom.
Option B: Intel NUC or Mini PC ($200-$400)
The best option for SEs who need a quiet, compact lab.
Recommended models:
- Intel NUC 12/13 Pro (i5 or i7) — $250-$400
- Beelink SER5/SER7 (AMD Ryzen) — $200-$350
- Minisforum UM780 XTX (AMD Ryzen 7) — $300-$450
Specifications to target:
- 32-64GB DDR4/DDR5 RAM
- 1TB NVMe SSD
- Intel i5/i7 12th gen+ or AMD Ryzen 5/7
Pros: Silent or near-silent operation, low power consumption (15-45W), small footprint, modern CPUs with strong single-thread performance.
Cons: Limited to 64GB RAM on most models, single network interface (add a USB Ethernet adapter), no hardware RAID.
Option C: Cloud-Based Lab ($50-$400/month)
For SEs who travel frequently or cannot run local hardware.
Platforms:
- AWS (EC2 bare metal or i3.metal instances for nested virtualization)
- Azure (Dv3/Ev3 series with nested Hyper-V)
- GCP (N2 instances with nested virtualization enabled)
- Proxmox on a dedicated server from Hetzner or OVH ($40-$80/month)
Pros: Accessible from anywhere, no hardware maintenance, easy to scale up/down.
Cons: Ongoing monthly cost, latency for console access, some security appliances do not license correctly in cloud environments.
Recommendation: Start with Option B (NUC/Mini PC) for most SEs. It provides the best balance of capability, noise level, and cost. If you need to run 8+ VMs simultaneously, go with Option A.
The Hypervisor Layer
Your hypervisor is the foundation of your lab. Choose one:
VMware ESXi (Free Tier)
- Best for: SEs who work with VMware in customer environments
- VMware offers a free ESXi hypervisor license for personal use
- vCenter is not included in the free tier but is not required for a single-host lab
- Strong community support and extensive documentation
Proxmox VE (Free, Open Source)
- Best for: SEs who want maximum flexibility without licensing concerns
- Supports both KVM virtual machines and LXC containers
- Built-in web GUI, no separate management server needed
- Pass-through GPU support for specialized workloads
- Active community and enterprise support available
EVE-NG Community Edition (Free)
- Best for: Network-focused labs with multiple routing/switching devices
- Purpose-built for network emulation
- Supports Cisco, Juniper, Palo Alto, and Fortinet images
- Browser-based topology builder
- Can run alongside Proxmox or on bare metal
Recommendation: Proxmox VE for most home lab use cases. It is free, well-documented, and handles mixed workloads (network devices + servers + endpoints) better than EVE-NG alone.
The Essential Lab Topology
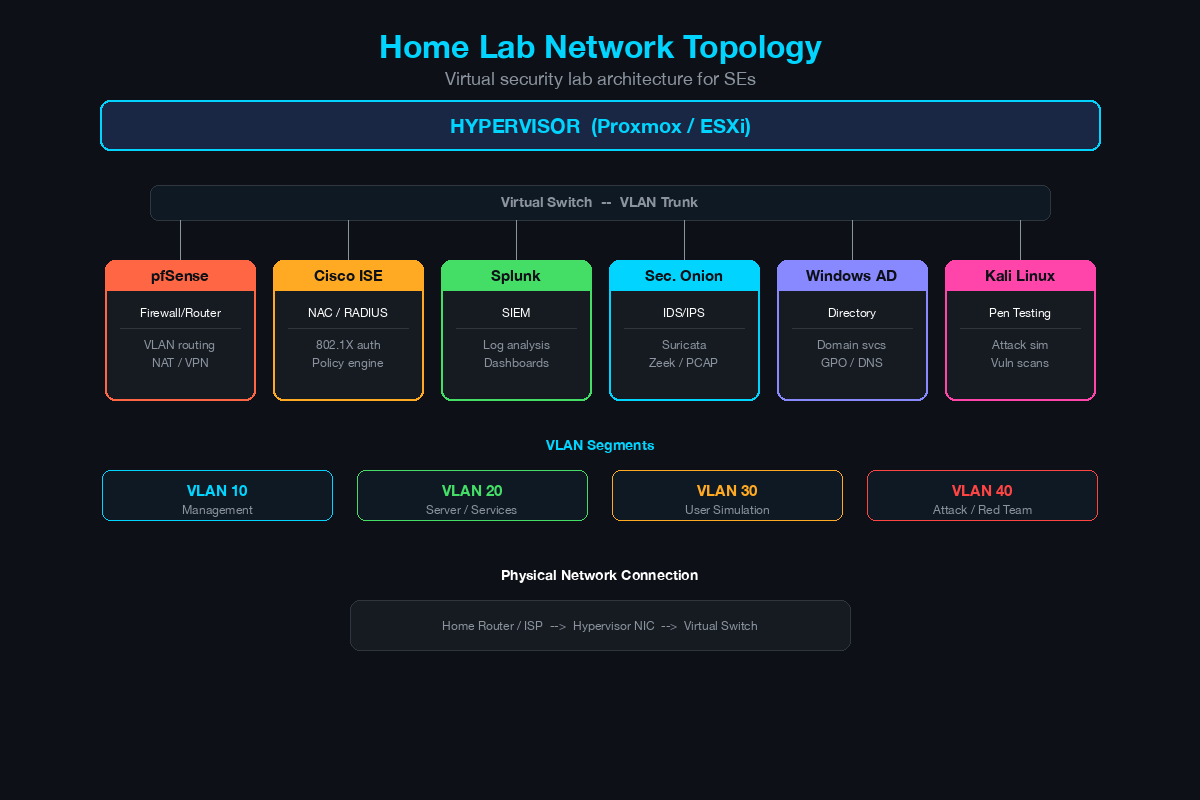
Here is the baseline topology that mirrors a typical mid-market customer environment:
[Internet/WAN Simulation]
        |
   [pfSense/FTDv]  ---- Firewall (perimeter security)
        |
   [Managed Switch] ---- VLAN segmentation
    /   |   \
   /    |    \
[VLAN 10] [VLAN 20] [VLAN 30]
 Corp    Server   Guest
  |        |        |
[Win10]  [AD/DNS] [Kali]
[Win11]  [ISE]
         [Splunk]
         [SecOnion]
Component Breakdown
| Component | Software | Purpose | RAM Required |
|---|---|---|---|
| Firewall | pfSense CE or Cisco FTDv | Perimeter security, VPN, NAT | 2-4 GB |
| Switch | Cisco IOSvL2 (via CML) | VLAN segmentation, 802.1X | 512 MB |
| Domain Controller | Windows Server 2022 Eval | AD, DNS, DHCP, Group Policy | 4 GB |
| ISE | Cisco ISE Eval | RADIUS, 802.1X, posture | 16 GB |
| SIEM | Splunk Free | Log aggregation, dashboards | 4 GB |
| Network Security Monitor | Security Onion | IDS/IPS, packet capture, threat hunting | 4-8 GB |
| Endpoint 1 | Windows 10/11 | Client simulation | 2-4 GB |
| Endpoint 2 | Kali Linux | Attack simulation, testing | 2 GB |
Total RAM required: 35-55 GB (this is why 64GB is recommended)
Free and Low-Cost Software Options
Network Simulation
- Cisco CML Personal ($199/year): Official Cisco images — IOSv, IOSvL2, ASAv, FTDv, ISE. The single best investment for Cisco SEs.
- GNS3 (Free): Open-source network emulator. Supports Cisco, Juniper, and others. Requires your own device images.
- EVE-NG Community (Free): Browser-based network emulation platform. Similar to GNS3 but with a web interface.
Firewalls
- pfSense Community Edition (Free): Full-featured open-source firewall. Excellent for simulating perimeter security.
- OPNsense (Free): Fork of pfSense with a more modern UI. Equally capable.
- Cisco FTDv: Available through CML Personal or as a 90-day evaluation.
- FortiGate VM: 15-day trial license, renewable through partner portals.
Identity and Access
- Cisco ISE Evaluation: 90-day evaluation license. Request through Cisco’s partner portal or sales team.
- FreeRADIUS (Free): Open-source RADIUS server. Useful for testing 802.1X without ISE licensing.
- Windows Server 2022 Evaluation: 180-day free evaluation from Microsoft Evaluation Center. Includes Active Directory, DNS, DHCP, NPS (Microsoft’s RADIUS server), and Certificate Authority.
SIEM and Monitoring
- Splunk Free (Free): 500MB/day data ingestion. Sufficient for lab use. Full search and dashboard capabilities.
- Security Onion (Free): Complete network security monitoring platform — Suricata IDS, Zeek, Elasticsearch, Kibana, and threat hunting tools.
- Wazuh (Free): Open-source SIEM and XDR platform. Good alternative to Splunk for endpoint detection labs.
- Elastic Security (Free tier): Free SIEM features with Elasticsearch backend.
Endpoints and Attack Tools
- Kali Linux (Free): The standard penetration testing distribution. Essential for attack simulation in your lab.
- Windows 10/11 Evaluation: Available from Microsoft Evaluation Center.
- Metasploitable (Free): Intentionally vulnerable Linux VM for testing exploits and detection rules.
- DVWA (Damn Vulnerable Web Application, Free): Vulnerable web app for testing web security tools.
Lab Scenarios That Mirror Real Customer Environments
Your lab is only valuable if you use it to practice scenarios you encounter in the field. Here are the scenarios every cybersecurity SE should be able to demonstrate:
Scenario 1: 802.1X Wired Authentication with ISE
This is the most commonly requested demo in network access control sales. Build it once, refine it constantly.
Setup steps:
- Configure Active Directory with OUs for employees and contractors
- Deploy ISE and join it to Active Directory
- Configure the IOSvL2 switch for 802.1X with RADIUS pointing to ISE
- Create ISE authentication and authorization policies (employee VLAN vs. contractor VLAN vs. guest VLAN)
- Test with a Windows 10 endpoint using EAP-TLS (certificate-based) and PEAP (username/password)
- Demonstrate posture assessment — endpoint compliance check before network access
What to practice: Troubleshooting authentication failures. Run debug radius authentication on the switch. Check ISE Live Logs. Identify common failures: certificate trust issues, supplicant misconfiguration, policy mismatches.
Scenario 2: SIEM Log Correlation and Dashboard
Customers evaluating SIEMs want to see their specific log sources correlated and visualized.
Setup steps:
- Configure pfSense/FTDv to send syslog to Splunk
- Configure Windows event log forwarding (WinRM or Splunk Universal Forwarder)
- Configure ISE to send RADIUS accounting and audit logs to Splunk
- Build dashboards: failed authentication attempts over time, firewall blocked connections by source IP, endpoint compliance status
- Create alerts: 5 failed logins in 10 minutes, connection to known-bad IP, new admin account created
What to practice: Writing SPL (Splunk Processing Language) queries on the fly. Customers will ask “Can you show me X?” during demos, and you need to build the search in real time.
Scenario 3: Network Segmentation Testing
Segmentation is a core use case for every firewall and NAC vendor.
Setup steps:
- Create VLANs for corporate, servers, guest, and IoT
- Configure firewall rules: corporate can reach servers, guest can reach internet only, IoT is isolated
- Demonstrate micro-segmentation with ISE Security Group Tags (SGTs) or firewall-based rules
- Test lateral movement: from a compromised endpoint in the corporate VLAN, attempt to reach the server VLAN
- Show how your security solution detects and blocks the lateral movement
What to practice: Whiteboard the segmentation architecture, then build it live. This is the most powerful demo technique — design it with the customer, then implement it in real time.
Scenario 4: Incident Response Workflow
SOC teams evaluating security products want to see the detection-to-response workflow.
Setup steps:
- Use Kali Linux to simulate an attack: port scan, exploitation of Metasploitable, data exfiltration attempt
- Show detection in Security Onion (Suricata alerts) and Splunk (correlated events)
- Demonstrate investigation workflow: pivot from alert to packet capture to affected endpoint
- Show containment: quarantine the endpoint using ISE (Change of Authorization) or firewall rule
What to practice: Narrating the workflow as you demonstrate it. Customers want to see both the technology and the process.
Scenario 5: VPN and Remote Access
Remote access is relevant for every enterprise customer.
Setup steps:
- Configure site-to-site VPN between pfSense and a second firewall instance
- Configure remote access VPN (GlobalProtect, AnyConnect, or OpenVPN)
- Demonstrate split tunneling vs. full tunneling
- Show posture checking: deny VPN access to endpoints that fail compliance
- Integrate with ISE for identity-based VPN policies
Cost Breakdown: The Under-$500 Lab
| Item | Cost | Notes |
|---|---|---|
| Intel NUC or Mini PC | $250-$350 | 32GB RAM, 512GB SSD included |
| Additional RAM (to 64GB) | $40-$60 | If NUC supports it |
| Managed Switch (used) | $30-$50 | Cisco 2960 or similar, eBay |
| Additional SSD (1TB) | $50-$80 | For VM storage |
| Cisco CML Personal | $199/year | Optional but highly recommended |
| Network cables | $10-$15 | Cat6, various lengths |
| Total (without CML) | $380-$555 | |
| Total (with CML) | $579-$754 | First year |
Everything else — Proxmox, pfSense, Security Onion, Splunk Free, Kali, Windows Eval — is free.
Lab Best Practices
Snapshot everything. Before making changes to any VM, take a snapshot. When your ISE configuration breaks during experimentation, you want to roll back in seconds, not spend an hour reinstalling. Create a “baseline” snapshot after initial setup is complete and working.
Document your lab. Keep a running document with IP addresses, VLANs, credentials (use a password manager), and configuration changes with dates.
Schedule lab time. Block 2-4 hours per week on your calendar. Without scheduled time, customer calls will consume every available hour and your lab will collect dust.
Customize for customers. Before a demo, change hostnames, VLAN names, and IP schemes to match the customer’s environment. Seeing “ACME-Corp-FW” instead of “Lab-FW” makes the demo feel personalized. Always run through the entire demo 24 hours before the customer meeting.
Your lab is your competitive advantage. Build it, maintain it, and use it to demonstrate what your competitors can only describe.
Related Posts in This Series
- Top 10 Certifications for Cybersecurity SEs — Use your lab to prepare for hands-on certification exams
- How to Demo a Firewall Without Boring the Room — Your home lab is where you build and rehearse customer demos
- Running a Cisco ISE POC: Timeline, Scope, and Gotchas — Practice ISE deployments in your lab before running customer POCs
- Cisco ISE vs Aruba ClearPass vs Forescout — Test NAC platforms side by side in your lab environment
- The SE’s Toolkit: Scripts, Templates, and Resources — Complement your lab with scripts and templates for customer engagements
Practice with free flashcards, quizzes, and hands-on lab scenarios at cciesec.it-learn.io — built specifically for the CCIE Security v6.1 written (350-701 SCOR) and lab exam.


