

Every endpoint on your network is an unknown until you profile it.
That MAB session on switchport Gi1/0/24 is just a MAC address. Without profiling, your authorization rule can do one of two things: permit everything (defeating the point of NAC) or deny everything (defeating the network). With profiling, ISE classifies the endpoint in seconds - Cisco IP phone, Apple iPhone, Brother printer, Axis camera, Linux workstation - and your policy can react accordingly. Voice VLAN for the phone, guest VLAN for the BYOD device, segmented VLAN for the printer, deny for the camera no one provisioned.
This post is the walkthrough of how ISE Profiling actually works. We cover the probe architecture, the profile hierarchy, the Certainty Factor that drives every match, the configuration steps, and the operational gotchas. If you finish this post you should be able to look at a profiler match in production and know exactly which probes produced which evidence and how the CF arithmetic resolved.
What ISE Profiling actually does
Three things, in this order:
- Collect. Probes gather evidence about the endpoint from whatever data sources are reachable - the DHCP request, the HTTP User-Agent header, the RADIUS authentication attributes, the CDP/LLDP neighbor reported by the NAD, the NMAP scan response, the NetFlow record.
- Match. ISE’s Profiler engine compares that evidence against the configured profile policy library, calculating a Certainty Factor for each candidate profile.
- Apply. The profile with the highest qualifying CF wins. The endpoint gets assigned to the matching Identity Group, and authorization policy that references that group fires automatically.
The data flow looks like this:
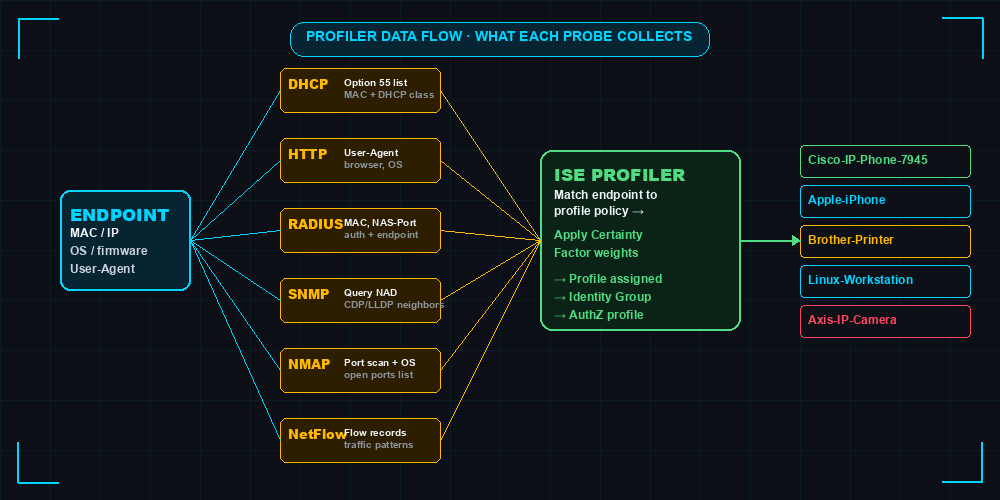
Two important properties of this design:
- Profiling is continuous, not one-shot. When a printer that was profiled as
Brother-MFC-9340gets reflashed with HP firmware, its DHCP fingerprint changes. ISE notices, re-profiles, and the new profile can trigger a CoA reauth to update the session’s VLAN. - Profiling does not require an agent. Every probe leverages telemetry the network already produces. No supplicant install. No endpoint software. That is the entire reason this feature exists - for the 60% of devices that cannot run an agent.
The probe architecture
ISE 3.x supports ten probe sources. Each one captures different evidence, with different latency, accuracy, and configuration cost. The probes that actually matter for most deployments are these:
| Probe | What it sees | Strength | Weakness |
|---|---|---|---|
| DHCP | DHCP class identifier, Option 55 list (param request list), hostname | Excellent for OS classification - Windows, macOS, iOS, Android, Linux each have a distinct Option 55 signature | Only fires on DHCP renewal; static-IP devices never trigger |
| HTTP | User-Agent string, browser hints | Best signal for distinguishing manufacturers (Apple-iPhone, Samsung-Galaxy) | Requires the endpoint to make an HTTP request; many IoT devices never do |
| RADIUS | Calling-Station-ID (MAC), NAS-Port, Framed-IP, User-Name | Always available for any auth session - no extra config | Limited fingerprinting power on its own; works best in combination |
| SNMP Query | Polls the NAD for CDP/LLDP neighbor table - reveals what’s connected on each port | Catches devices that report themselves via CDP/LLDP (phones, APs, neighbor switches) | Adds load on the NAD; SNMPv3 credentials need careful handling |
| SNMP Trap | NAD sends linkUp / MAC notification traps to ISE | Real-time visibility on new endpoints | Trap configuration on every NAD is operational overhead |
| NMAP | Active port scan + OS detection against the endpoint IP | Strong OS fingerprint for endpoints that show up in DHCP/RADIUS but not HTTP | Generates scan traffic the SOC may flag; only practical against a subset of devices |
| NetFlow | Flow records from network devices showing traffic patterns | Detects rough device class from network behavior (printer beacons, IP camera RTSP) | Requires flow export config; mostly used in larger deployments |
| DNS | DNS reverse lookup of endpoint IP | Adds friendly hostname information | Limited; mostly cosmetic |
| Active Directory | LDAP query against AD for the resolved user | Useful for joining computer-name evidence to identity | AD-joined endpoints only |
| pxGrid Subscriber | Subscribes to context from other pxGrid-enabled tools | Federates with Cisco Secure Endpoint, third-party MDM | Requires pxGrid certificate exchange |
In practice, enable DHCP, HTTP, RADIUS, and SNMP Query as your baseline. That combination profiles 80% of endpoints correctly without significant operational cost. Add NMAP only against networks where you have static-IP endpoints that DHCP cannot see.
Profile hierarchy: parent inherits, child refines
ISE ships with thousands of pre-built profile policies - Cisco creates them, ISE pulls them in via the Profiler Feed Service. The library is organized as a tree: generic profiles at the top, specific models at the bottom. Each child inherits the matching conditions of its parent and adds more.
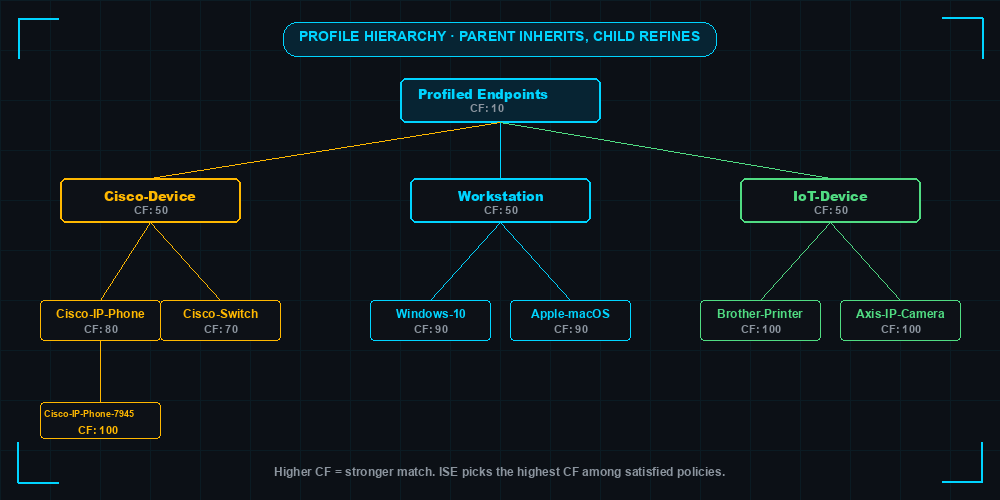
A few hierarchy patterns to internalize:
Profiled Endpointsis the top of the tree - every endpoint that profiled at all matches this. CF 10. Useful for catch-all policy (“permit any profiled endpoint to the internet but deny anything unprofiled”).Cisco-Device→Cisco-IP-Phone→Cisco-IP-Phone-7945is a typical chain. The intermediate level (Cisco-IP-Phone) is the one most authorization rules reference, because it covers every Cisco phone model without needing per-model authz rules.Workstation→Apple-Device→Apple-iPadand similar BYOD chains are pre-built and you generally just reference them in policy without modification.- Custom profiles go alongside the Cisco-shipped library. You typically only create custom profiles for in-house IoT devices that the feed service does not cover (DC-room HVAC sensors, custom kiosks, manufacturing-floor controllers).
When multiple profiles in the tree satisfy the endpoint’s evidence, ISE assigns the most specific one with the highest CF. So an iPhone running iOS 17 would profile as Apple-iPhone if only the User-Agent fired, but escalate to Apple-iPhone-iOS-17 if a DHCP fingerprint also matched and the combined CF crossed the more specific profile’s threshold.
Certainty Factor: the arithmetic that decides
Every profile policy has one or more conditions. Each condition has a numeric weight. When the endpoint’s evidence satisfies a condition, that weight is added to the running CF total for that profile. When the total crosses the profile’s threshold (called the Minimum Certainty Factor in the policy), ISE assigns the profile.
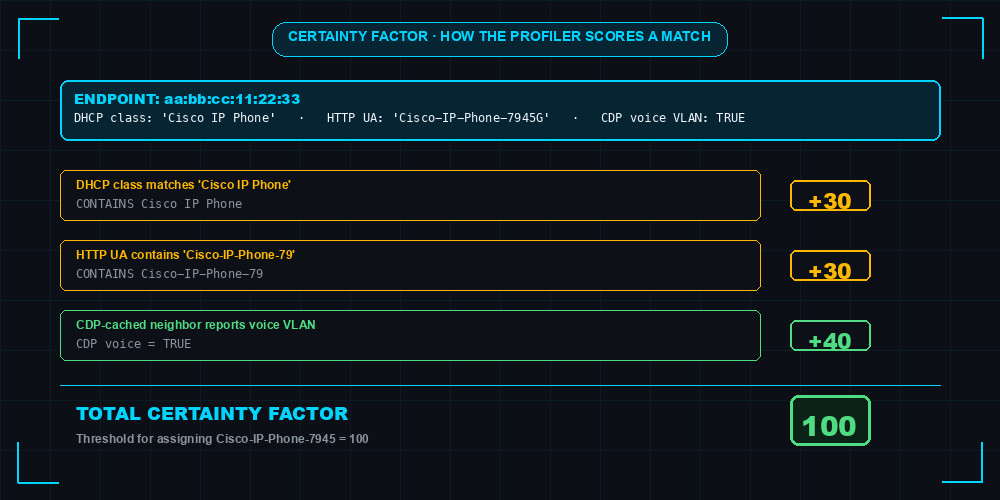
Working through that diagram:
- DHCP class identifier matches
Cisco IP Phone→ +30 - HTTP User-Agent contains
Cisco-IP-Phone-79→ +30 - CDP neighbor cache on the NAD reports voice VLAN TRUE → +40
Total CF = 100. The Cisco-IP-Phone-7945 profile requires CF ≥ 100, so the endpoint is assigned to that profile. The matching Identity Group (Cisco-IP-Phones) fires, and any authorization rule conditioned on that group runs.
Why weights matter: they let you express confidence. A DHCP class is fairly reliable but can be spoofed. CDP voice VLAN is reported by the NAD on Layer 2, which is harder for the endpoint to fake. So you weight CDP higher. The cumulative score is more robust than any single condition.
Tuning weights: in normal operation you do not touch them. The Cisco-shipped weights are calibrated. If you find a custom profile mis-classifying, the answer is usually “the conditions are wrong, not the weights.” Modify conditions first; weights only as last resort.
Configuration walkthrough
The order of operations matters. Configure probes first, then validate that endpoints are showing up correctly, then layer authorization on top. Do not start with policy and work backward.
1. Enable probes on the PSN
Administration → System → Deployment → <PSN node> → Profiling Configuration
Enable the probes you actually need (start with DHCP, HTTP, RADIUS, SNMP Query):
- DHCP - set the network interface and listen for DHCP broadcasts. If your DHCP server is in a different subnet, you also need IP helper-address configured on the SVI of the user VLAN pointing at the ISE PSN.
- HTTP - listens for HTTP traffic on the PSN interface. Combined with the URL-redirect mechanism from authorization profiles, the endpoint is forced through the PSN’s HTTP probe before being granted access.
- RADIUS - implicit; the RADIUS auth flow already passes endpoint attributes to the profiler.
- SNMP Query - requires SNMPv2c read-only community string OR SNMPv3 credentials configured on every NAD. Add the NAD’s SNMP settings under
Administration → Network Resources → Network Devices.
2. Verify endpoints are being profiled
Context Visibility → Endpoints
After enabling probes, generate some endpoint traffic - boot a phone, plug in a printer, connect a laptop. Within 30-60 seconds the endpoints should appear in Context Visibility with non-empty Profile, Identity Group, OS, and Device Type columns.
If endpoints show up as Unknown after a few minutes, the probes are not collecting data. Debug in this order:
- DHCP not firing? Check that DHCP relay (
ip helper-address <PSN-IP>) is on the user VLAN’s SVI. The DHCP probe needs to SEE the request packets. - HTTP not firing? Check that the URL-redirect authorization profile is correctly redirecting unknown endpoints to the PSN’s redirect URL.
- SNMP not firing? Run
nc -zv <NAD-IP> 161from the PSN. Check NAD’ssnmp-server communityconfiguration. - All probes failing? Check that the Profiler Service is started on the node (
show application status ise).
3. Configure authorization to use the profile
Now you can write authorization rules like:
Rule: Voice-Endpoints
  Condition:  Wireless_802.1X
              AND EndpointIdentityGroup EQUALS Cisco-IP-Phones
  Permissions: Voice-VLAN-Profile (VLAN 100, voice-dACL)

Rule: IoT-Printers
  Condition:  Wired_MAB
              AND EndpointIdentityGroup EQUALS Printers
  Permissions: IoT-Printer-Profile (VLAN 30, printer-dACL)

Rule: Unprofiled-Devices
  Condition:  ANY
              AND EndpointIdentityGroup EQUALS Unknown
  Permissions: Quarantine-Profile (VLAN 999, deny-all dACL)
The third rule is the safety net. Anything that does not profile lands in quarantine. This is the right default - the only valid response to “I don’t know what this device is” is “limit what it can reach.”
4. (Optional) Build Logical Profiles for cleaner policy
A Logical Profile groups multiple device profiles for single-rule reference. Example:
Administration → Endpoint Policies → Logical Profiles → Add
Name: Printers-All
Assigned profiles: HP-Printer-Family, Brother-Printer-Family, Xerox-Printer-Family, Canon-Printer-Family
Now authorization uses EndpointPolicy EQUALS Logical-Profile:Printers-All instead of five separate rules. Cleaner to maintain.
Operational gotchas
1. Endpoint Purge Policy - Administration → System → Settings → Endpoint Purge. By default, ISE deletes endpoints not seen in 30 days. If you have devices that go dark for longer (kiosks, seasonal equipment), bump this up before they get purged and re-profile from scratch.
2. Profiler Feed Service - Administration → FeedService → Profiler. Cisco ships new profile policies regularly (new iPhone models, new IoT device classes). Enable the feed and configure auto-download. Without this, your profile library ages out.
3. EPS (Events Per Second) - high-traffic environments can overload the profiler. ISE imposes EPS limits per probe. If your endpoints are not getting re-profiled fast enough, check Operations → Reports → Profiler Reports → EPS Rate Per Probe.
4. Anomalous Endpoint Detection - ISE can flag endpoints whose profile changes drastically (a printer suddenly looks like a Linux server - could be a spoof). Enable under Administration → System → Settings → Profiling → Anomalous Endpoint Detection. Pairs well with ITDR-style behavioral scoring for richer threat response.
5. Identity Group vs Endpoint Policy - there is a subtle difference in authorization. EndpointIdentityGroup is a static group membership; EndpointPolicy is the matched profile. Authorization rules can reference either. Use EndpointIdentityGroup for human-managed groupings (e.g., a custom group called Lab-Devices) and EndpointPolicy for profile-driven decisions.
6. NMAP probe scan range - by default NMAP runs against the endpoint’s IP. In segmented environments, the PSN must have IP reachability to the endpoint’s subnet, which sometimes requires explicit routing or firewall rules. Test with nmap -sT -sV <endpoint-IP> from the PSN before enabling the probe in production.
Common use cases this enables
- IoT segmentation - printers, cameras, badge readers each get their own VLAN and dACL with no manual intervention. The profile-driven policy makes this work at scale.
- BYOD discovery - combined with a BYOD onboarding portal, profiling identifies the personal-device category before the user even reaches the registration screen.
- Quarantine-on-anomaly - when a profiled iPhone suddenly looks like a Linux server, the ITDR scoring layer can issue a CoA reauth to quarantine before the session establishes.
- Voice VLAN automation - every Cisco IP phone profiles into the
Cisco-IP-Phonesgroup; one authorization rule covers all voice handsets without needing per-model rules. - Compliance reporting - auditors love being able to say “show me every endpoint on the corporate network and what profile ISE assigned it.” Context Visibility exports this directly.
Lab + study tips
If you have a Cisco dCloud ISE sandbox, the easiest lab is:
- Boot the lab’s vWLC and Ubuntu test host
- Enable DHCP + HTTP + RADIUS probes on the PSN
- Connect the Ubuntu host with a Linux DHCP request, then visit the captive portal in a browser
- Watch the endpoint profile change from
Unknown→Workstation→Linux-Workstationin Context Visibility as evidence accumulates
For CCIE Security study, the topics you should be able to answer cold:
- Order of probe priority and which probes fire when (DHCP on renewal, HTTP on captive-portal redirect, etc.)
- How Certainty Factor accumulates and what the threshold means
- The difference between
EndpointPolicyandEndpointIdentityGroupin authorization rule conditions - When to use a Logical Profile vs individual profile policies
- How the Profiler Feed Service updates the library and what happens if it is disabled
- The relationship between Profiling and MAB - profiling does not bypass authentication; it enriches the auth decision
Most of the Profiling exam questions in 350-701 SCOR are scenario-based: “given this endpoint and these probe events, what profile assigns and which authorization rule fires?” Practice that pattern.
Related Posts
- Building a Production-Grade Cisco ISE Deployment in One Sitting - the automation playbooks that bootstrap profiling
- Cisco ISE Active Directory Integration: Complete Guide - the identity store profiling feeds into authorization
- Cisco ISE Posture Assessment Complete Configuration Guide - the next layer beyond profiling for managed devices
- ITDR on Cisco ISE: Behavioral Identity Scoring with AWS Serverless - the behavioral scoring layer that pairs with profiling-driven policy
- Splunk + Cisco ISE Syslog Integration RADIUS Dashboard - operational visibility on the profiler decisions
Tested against Cisco ISE 3.4 with a Catalyst 9800-CL WLC and dCloud Ubuntu test host. Profiler Feed Service enabled with auto-download. Configuration patterns valid on ISE 3.2 and 3.3 with minor menu-path differences.
Practice with free flashcards, quizzes, and hands-on lab scenarios at cciesec.it-learn.io — built specifically for the CCIE Security v6.1 written (350-701 SCOR) and lab exam.


