
If your network has any combination of corporate Wi-Fi, AD-joined users, and people who own phones, you have a BYOD problem. The question is not whether to solve it. The question is whether the solution forces a helpdesk ticket for every device.
Cisco ISE has had BYOD onboarding as a built-in feature since 1.2. The pattern is well-proven, the moving parts are well-documented, and the result — when configured correctly — is a self-service flow that takes an employee from “I have a new phone” to “I am on corporate Wi-Fi with full access” in about three minutes. Zero helpdesk tickets, zero credentials shared, every device individually identified and revocable.
This is the configuration walkthrough. We cover the dual-SSID architecture (the easier-to-deploy variant), the internal CA setup, the Native Supplicant Provisioning flow, the MyDevices portal, and the lifecycle management that keeps the system clean over time.
Why BYOD onboarding matters
Three converging pressures make BYOD a forcing function for any meaningful network security:
- Personal devices outnumber corporate devices on the LAN. A typical office has 1.5-2 personal devices per employee (phone + tablet) on the wireless network. They all need IP addresses, they all need access controls, and treating them as “guest” defeats the productivity reason they are on the network in the first place.
- Pre-shared keys do not survive at scale. “Just give them the Wi-Fi password” works for a 10-person startup. At 1,000 employees, the password has leaked twice this week, and there is no way to revoke a single device without rotating the key for everyone.
- Compliance requires per-device identity. PCI-DSS, HIPAA, NIST 800-171 — all of them require knowing what devices are on the network and being able to revoke access for any single device. Pre-shared keys cannot do this. Certificates can.
BYOD onboarding solves all three by issuing a per-device certificate that becomes the authentication credential. The certificate is bound to the user identity (so revocation works), is unique per device (so loss/theft scopes precisely), and uses EAP-TLS for the wireless auth (which is phishing-resistant by design).
The architecture: dual-SSID flow
The cleanest BYOD deployment uses two SSIDs:
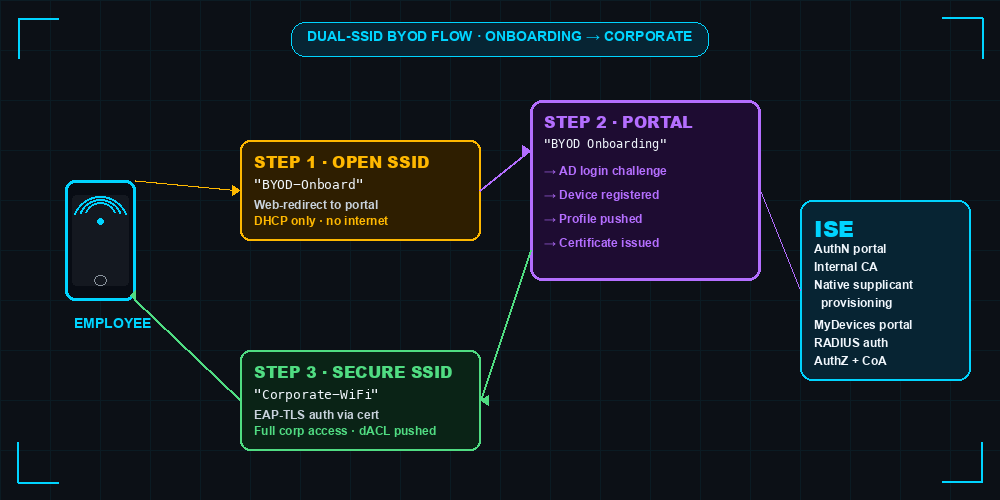
How the user experiences it:
- New employee with a new phone selects
BYOD-Onboard(open SSID) from the available networks list. - Phone connects, gets DHCP, opens browser. Captive portal redirects them to ISE’s BYOD onboarding page.
- They authenticate with their AD credentials.
- ISE detects their device’s OS and pushes a native supplicant profile + a personal certificate.
- Phone automatically reconnects to
Corporate-WiFi(secure SSID) using EAP-TLS with the new certificate. - They have full corporate access. The open SSID is no longer needed.
How the network sees it:
- The open SSID has aggressive DHCP scope limits and a permit-only-to-ISE-PSN dACL. Endpoints connected to it can only talk to ISE for portal traffic — nothing else.
- The secure SSID is WPA2-Enterprise (or WPA3-Enterprise) with EAP-TLS only — no PEAP, no PSK. Certificate-based auth only.
- ISE owns the entire decision flow. Wireless LAN Controller (WLC) is a RADIUS authenticator that just enforces what ISE says.
Single-SSID variant: if you prefer one SSID, ISE supports it. The flow starts with EAP-PEAP using AD credentials, then provisions the certificate in-band, then switches the device to EAP-TLS. Cleaner user experience but more complex to configure. Most deployments start with dual-SSID and only move to single-SSID after they have the basics working.
Phase 1: Configure ISE internal CA
Administration → System → Certificates → Certificate Authority → Internal CA Settings
The ISE internal CA is the simpler PKI option. It is self-signed by default, scoped to BYOD endpoint certificates only, and managed entirely within ISE. For most deployments this is sufficient — the endpoint certificates only need to be trusted by ISE itself for EAP-TLS validation.
Settings to verify:
- CA Certificate Subject — defaults to
cn=Cisco ISE Internal CA, ou=Certificate Services. Customize to match your naming convention. - Issuance —
Certificate Templatedefines the validity period (typically 1 year for BYOD), key size (2048 minimum, prefer 4096), and Subject Alternative Name fields. - Revocation — enable CRL publication so revoked certificates are actually rejected. CRL distribution point is auto-populated.
If your organization uses Microsoft AD CS or a third-party PKI and you want BYOD certificates issued by the corporate CA instead, ISE supports SCEP integration. Configure it under Administration → External RADIUS Servers → SCEP Profiles. Detail is out of scope for this post; the internal-CA path covers 90% of deployments.
Phase 2: Configure the wireless infrastructure
This is half-WLC, half-ISE. The WLC side first:
On the WLC (C9800 or AireOS)
Open SSID for onboarding:
wlan BYOD-Onboard 1 BYOD-Onboard
 no security wpa
 ! Open security (no encryption, will get web-redirected by ISE)
 mac-filtering default                       ! Triggers MAB to ISE
 client vlan VLAN_50_BYOD_ONBOARD            ! Dedicated onboarding VLAN
 no shutdown

policy-map type policy-pmap PMAP-BYOD
 event session-started
  10 class always do-until-failure
   10 authenticate using mab priority 10
Secure SSID for corporate access:
wlan Corporate-WiFi 2 Corporate-WiFi
 security wpa wpa2
 security wpa wpa2 ciphers aes
 security dot1x authentication-list ISE-AUTH-LIST
 ! No EAP method specified — ISE drives the EAP method via policy
 client vlan VLAN_10_CORP                    ! Production corp VLAN
 no shutdown
Both SSIDs point to ISE as the AAA server. Standard RADIUS auth list config:
aaa group server radius ISE-RADIUS-GROUP
 server name ISE-PSN-01

aaa authentication dot1x ISE-AUTH-LIST group ISE-RADIUS-GROUP
aaa authorization network ISE-AUTH-LIST group ISE-RADIUS-GROUP
On ISE
Administration → Network Resources → Network Devices — register the WLC with shared secrets, assign to a NDG like Device Type#WLC#C9800.
Work Centers → BYOD → Portals & Components → BYOD Portals — configure the BYOD Portal. Key settings:
- Authentication method — Active Directory (typically
dcloud_ADor your AD join point) - Acceptable Use Policy — text shown to user during onboarding; required by most compliance regimes
- Device Type Detection — leave defaults; ISE detects iOS/Android/Windows/macOS automatically
- Certificate Template — points to the internal CA template you configured in Phase 1
- Maximum number of registered devices — typically 3-5 per user. Caps device sprawl per identity.
Phase 3: Native Supplicant Provisioning (NSP)
This is the actual onboarding work — what happens between “user opens portal” and “device joins secure SSID.”
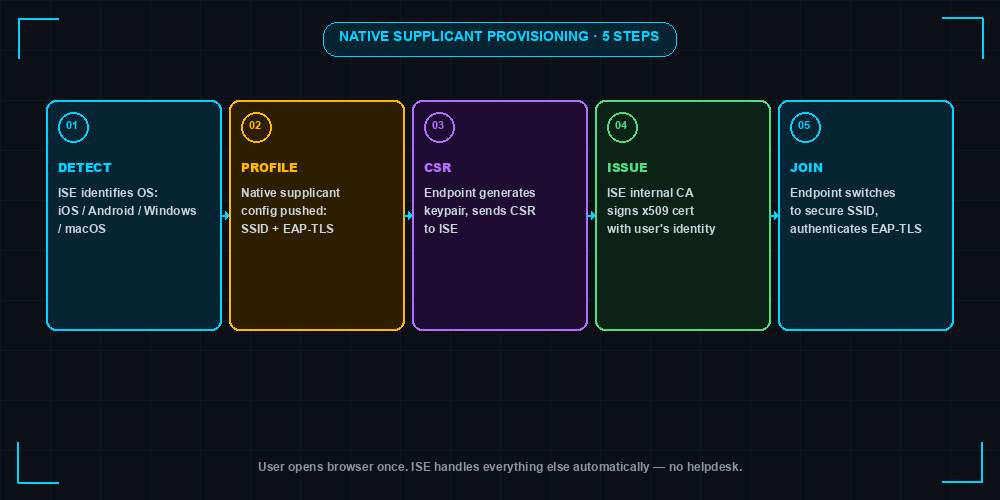
The five-step flow is platform-specific in implementation but consistent in shape:
- Detect OS — ISE reads the User-Agent header from the captive-portal HTTP request to identify iOS, Android, Windows, or macOS.
- Push profile — for iOS/macOS, ISE generates an Apple Configuration Profile (
.mobileconfig) that includes the secure SSID name, EAP-TLS configuration, and certificate placeholders. For Android, ISE redirects to the Cisco Network Setup Assistant app (Play Store). For Windows, ISE pushes an XML profile via SCEP. Each platform handles this slightly differently but the user experience is uniform: “tap to install profile.” - Endpoint generates CSR — the platform-specific supplicant generates a keypair and sends the public key to ISE as a Certificate Signing Request. The private key never leaves the device.
- ISE signs the cert — the internal CA issues the certificate with the user’s identity in the CN/SAN fields. Certificate is sent back to the endpoint and installed in the system keychain.
- Endpoint joins secure SSID — the supplicant uses the new certificate as the EAP-TLS credential. ISE verifies the cert chain, runs the AuthZ policy against the now-known endpoint, and assigns the production VLAN + dACL.
Work Centers → BYOD → Settings → Native Supplicant Profiles — configure one profile per supported OS. The Cisco-shipped templates are good starting points; customize SSID names and EAP timing parameters.
iOS gotcha: modern iOS (15+) requires the BYOD portal page to be served via a publicly-trusted certificate. If your ISE portal cert is signed by your internal CA, the iOS user will see a “Not Secure” warning and the install will fail. The fix: deploy a public CA-signed certificate on the ISE portal interface specifically for BYOD. Use a wildcard cert if you have one; otherwise a Let’s Encrypt cert via SCEP works.
Android gotcha: modern Android (12+) requires the SetupAssistant app from the Play Store — there is no in-OS supplicant provisioning anymore. Users without Play Store access (corporate Android-restricted profiles) cannot complete BYOD via this flow.
Phase 4: Create the BYOD authorization rules
This is the authorization policy that ties everything together:
Policy Set: Wireless-BYOD
  Condition: NAS-Port-Type EQUALS Wireless 802.11
             AND Device-Type EQUALS WLC

  Authentication Policy:
    Rule: BYOD-Onboard-MAB
      Condition: SSID EQUALS BYOD-Onboard
      Identity Source: Endpoint-Identity-Group

    Rule: BYOD-Corp-EAP-TLS
      Condition: SSID EQUALS Corporate-WiFi
      Identity Source: Internal-Certificate-Authority

  Authorization Policy:
    Rule: BYOD-Onboarding-WebRedirect
      Condition: SSID EQUALS BYOD-Onboard
                 AND EndpointIdentityGroup EQUALS Unknown
      Permissions:
        - Web Redirect to BYOD Portal
        - dACL: PERMIT_ISE_PSN_ONLY
        - VLAN: 50 (onboarding VLAN)

    Rule: BYOD-Registered-Corp-Access
      Condition: SSID EQUALS Corporate-WiFi
                 AND BYOD_Registration EQUALS Yes
                 AND EAP_Authentication_Method EQUALS EAP-TLS
      Permissions:
        - VLAN: 10 (corporate VLAN)
        - dACL: PERMIT_CORP_RESOURCES

    Rule: BYOD-Default-Deny
      Condition: ANY
      Permissions: DenyAccess
The pattern: open SSID gets the web-redirect rule and limited VLAN. Secure SSID matches on BYOD_Registration = Yes (set by ISE during onboarding) and EAP-TLS auth method. Default-deny is the safety net.
Phase 5: Lifecycle management (MyDevices portal)
Work Centers → BYOD → Portals & Components → My Devices Portals — configure the self-service portal where employees manage their registered devices.

Employees can self-serve:
- Register a new device — they fill in a device name and certificate is provisioned (same NSP flow as initial registration)
- List existing devices — see all their registered devices, when each was last seen, and their assigned certificate serial numbers
- Flag a device as lost — ISE immediately revokes the certificate and issues a CoA disconnect to kick the session. Device is now blocked from corporate Wi-Fi.
- Reset password — if the AD password expired, employee can self-service reset without involving helpdesk
Every action is logged in the ISE Endpoint Identity. Helpdesk involvement: zero, in 95% of cases.
Operational gotchas
1. Portal certificate must be publicly trusted. Internal-CA-signed portal certs trigger “Not Secure” warnings on modern iOS, which abort the onboarding install silently. Use a public-CA-signed cert (Let’s Encrypt is fine) for the BYOD portal interface.
2. Endpoint Purge Policy affects BYOD certs. If the endpoint purge runs and removes a registered endpoint, the associated certificate is orphaned but still trusted by ISE. The user can still connect using the cert until it expires. Audit the purge policy to exclude registered BYOD endpoints, or extend their LastActivity regularly via authentication events.
3. Multiple devices per user requires careful config. Default ISE limit is 5 registered devices per user identity. If you have power users with phone + tablet + laptop + smart watch + iPad, bump this up under the BYOD Portal settings.
4. Certificate Authority CRL distribution. If CRL publication is disabled, revoking a certificate (via MyDevices “lost device” or admin action) doesn’t actually prevent the device from connecting — ISE only checks the cert validity, not the revocation status. Enable CRL publication, ensure it propagates, and verify with a manual revocation test.
5. The certificate template’s EKU matters. Make sure the BYOD certificate template includes the Client Authentication Extended Key Usage. Without it, EAP-TLS will reject the cert silently.
6. Profiling and BYOD interact. ISE profiles the endpoint before BYOD onboarding begins. If your profiling configuration is buggy and the device profiles as Unknown, the BYOD redirect rule may not match correctly. Verify profiling works before deploying BYOD.
7. Android supplicant install requires user trust. During NSP, Android prompts the user to accept the certificate and install the supplicant config. Some MDM-managed corporate Android devices block this prompt entirely. Test with your actual MDM policy before rollout.
8. AnyConnect Secure Client compatibility. If your organization deploys Cisco Secure Client (formerly AnyConnect) on personal devices, the Secure Client supplicant can replace the native supplicant in the BYOD flow. ISE detects this and uses Secure Client’s profile-deployment mechanism instead. Smoother for managed environments but adds licensing requirements.
Common questions answered
“Can BYOD work without an MDM?” — Yes. BYOD onboarding via ISE does not require an MDM. The certificate is issued to the device and stored in the OS keychain; ISE does not need ongoing device management. For higher-assurance environments where you also want device compliance posture (e.g., screen lock enabled, OS patched), pair BYOD with a posture check or an MDM integration like Microsoft Intune.
“What about Windows Hello for Business?” — Windows 10/11 supports BYOD via WHfB by treating the device’s Hello certificate as the BYOD credential. The flow is slightly different (ISE accepts the existing WHfB cert rather than issuing a new one). Configurable under Work Centers → BYOD → Settings → Provisioning.
“Can I revoke individual devices?” — Yes, via the MyDevices portal (user-initiated) or via Context Visibility → Endpoints → select endpoint → Actions → Revoke Certificate (admin-initiated). Revocation publishes to the CRL and the next authentication attempt fails.
“What’s the deprovisioning flow for employees who leave?” — When AD disables a user account, the next EAP-TLS authentication fails because ISE validates the user’s AD status. The certificate is technically still valid until you revoke it, but the AuthZ rule does not match anymore. For full hygiene, revoke certificates via a daily cleanup job that queries AD for disabled users.
Lab + study tips
If you have a Cisco dCloud ISE sandbox:
- Configure the C9800-CL WLC with two SSIDs (
BYOD-Onboardopen,Corporate-WiFiWPA2-Enterprise) per the snippets above - Enable the ISE internal CA + BYOD portal
- Use your laptop’s Wi-Fi to connect to the open SSID; you should get the captive portal
- Authenticate with the dCloud AD user; complete the onboarding flow
- Check
Context Visibility → Endpoints— your laptop should now show “BYOD Registered = Yes” and a certificate serial - Disconnect from
BYOD-Onboard, connect toCorporate-WiFi— should authenticate with EAP-TLS automatically
For CCIE Security study, the BYOD topics to know cold:
- The difference between dual-SSID and single-SSID flows (and when to use each)
- Native Supplicant Provisioning steps for each major OS
- Certificate lifecycle: issuance, renewal, revocation, CRL/OCSP
- The interaction between BYOD and the Authorization policy (rule ordering matters)
- MyDevices portal capabilities (what users can self-serve vs what requires admin)
- ISE internal CA vs external (SCEP, MS AD CS) tradeoffs
Related Posts
- Building a Production-Grade Cisco ISE Deployment in One Sitting — the wider ISE deployment story this layer sits on top of
- Cisco ISE Profiling: Device Fingerprinting Configuration Guide — profiling identifies the device class before BYOD onboarding begins
- Cisco ISE TACACS+ Device Admin Guide — Done Safely — yesterday’s post on the device-admin half of ISE
- Cisco ISE Active Directory Integration: Complete Guide — the AD identity store that authenticates BYOD users
- Cisco ISE Posture Assessment Complete Configuration Guide — companion to BYOD when device compliance matters
Configuration tested against Cisco ISE 3.4 with C9800-CL WLC 17.09, AD identity source via dcloud join point, ISE internal CA for endpoint certificates. iOS 17, Android 13, Windows 11 supplicant flows validated.
Practice with free flashcards, quizzes, and hands-on lab scenarios at cciesec.it-learn.io — built specifically for the CCIE Security v6.1 written (350-701 SCOR) and lab exam.


