

A digital forensic examiner spends years learning how to recover deleted files, parse registry hives, and reconstruct attacker timelines from sparse evidence. None of that matters if the evidence is inadmissible in court.
Chain of custody is the documentation discipline that keeps evidence admissible. It is not technically hard - it is a form, signatures, and storage rules. But it is the single most common reason digital evidence gets thrown out, and every working examiner has a story about a case where a sloppy chain undid weeks of investigative work.
This post walks through what chain of custody is, the seven failure modes that break it in practice, the form fields the court actually requires, and the operational habits that make breaks impossible rather than unlikely.
What chain of custody really protects
Three threats to the integrity of digital evidence:
- Modification - the bits in the image change between acquisition and presentation. Someone analyzes the image without read-only mounting. A tool writes back to it. A file gets accidentally edited. The hash no longer matches.
- Substitution - the image presented in court is not the same image that was acquired from the suspect’s drive. Same case number on the label, different bits inside. Without continuous documentation of who had the image when, you cannot prove the image now is the image then.
- Contamination - the image picks up artifacts from the examiner’s environment. File access timestamps on the source drive get updated when it auto-mounts. The image acquires examiner-workstation registry entries because it was processed on a system that also handled other cases.
A working chain of custody form is the legal mechanism that proves none of those happened. If you can show, with timestamps and signatures, that every person who touched the evidence is documented and that the cryptographic hash never changed across all those custody transfers - the court accepts the evidence as authentic.
If you have any gap - a missing signature, an unexplained period, a hash that does not match - the defense moves to suppress and usually wins.
The five steps every piece of evidence goes through
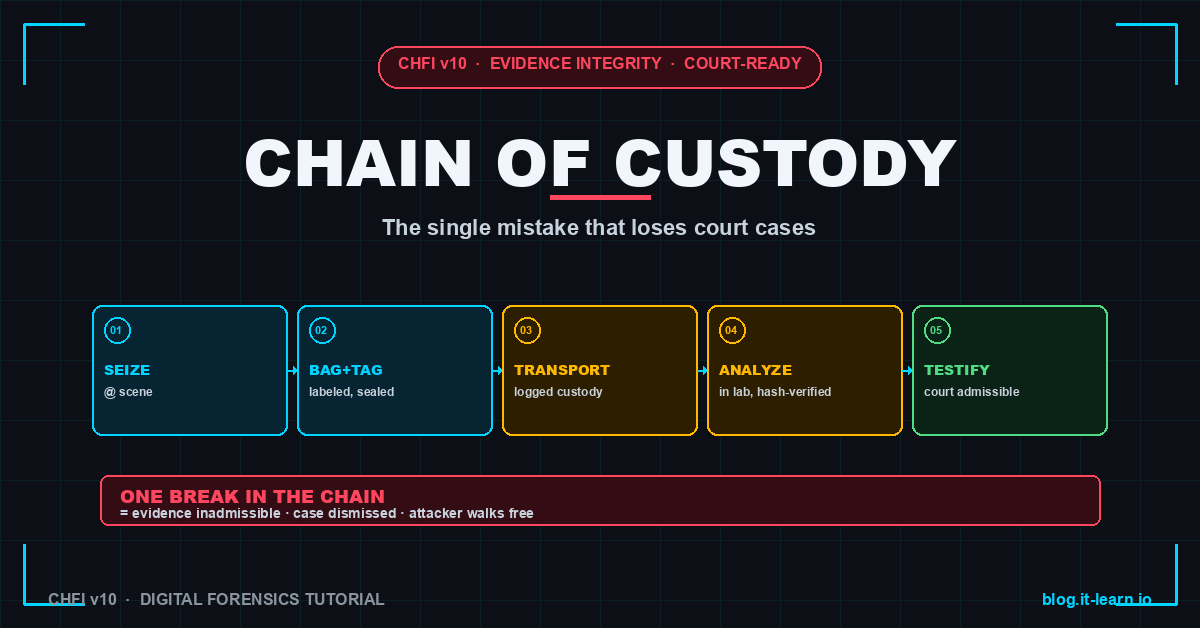
Each step has a custody event that needs documentation:
1. Seize at the scene. The investigator takes possession of the evidence. Documented: exact time, location, who was present, condition of the item, photographs of the item in place before removal, and the form of seizure (warrant, consent, exigent circumstances).
2. Bag and tag. Evidence is placed in a sealed evidence bag with a tamper-evident seal, labeled with case identifier, evidence number, item description, date/time, and the seizing officer’s name and signature. Hard drives and laptops typically also get an anti-static bag inside the evidence bag.
3. Transport. Evidence moves from scene to lab. Each person who has custody during transport signs the form. If evidence is shipped, the courier waybill becomes part of the chain.
4. Analyze in the lab. The image is acquired (see the disk imaging post for the technical details). Source hash and image hash are recorded. The original drive goes into write-protected evidence storage. All analysis happens on the image, not the original.
5. Testify in court. The examiner presents findings. The chain of custody form is entered as evidence alongside the technical findings. The court verifies the chain is unbroken before accepting the technical evidence.
The 7 failure modes that break the chain
Every one of these has cost cases. They are the patterns that come up over and over in suppression hearings.
1. Unbagged or improperly sealed evidence
The investigator at the scene seizes a laptop, puts it in their car, and drives back to the lab without bagging it. There is now a window of time where the laptop was in the investigator’s car with no tamper-evident seal. The defense argues someone could have accessed it. Burden of proof flips to the prosecution.
The fix: carry evidence bags and tamper-evident seals to every scene. Bag the moment of seizure. Sign and date the seal.
2. Missing custody transfer signatures
Evidence moves from Investigator A to Lab Tech B. The lab tech signs receipt. Then it goes to Analyst C. Analyst C does not sign - they just take it. The chain has a gap. Was the evidence in Analyst C’s possession? Lab Tech B’s? Who else had access during that window?
The fix: every transfer requires two signatures - releasing and receiving. No exceptions. Even for “I just walked it across the office.”
3. Missing or mismatched hashes
Evidence acquisition completes. The examiner records the image hash but not the source hash, or vice versa. Months later in court, the defense asks how the examiner knows the image matches the original. There is no source hash to compare to.
The fix: record both source AND image hash at acquisition. SHA-256 minimum. Re-verify the image hash before any analysis begins, and again at end of analysis.
4. Storage in non-evidence-controlled spaces
The examiner leaves a USB drive containing case evidence on their desk overnight. The office has 30 people who walked past it. The defense argues anyone could have substituted a different drive.
The fix: evidence storage means a locked cabinet or safe accessible only to documented evidence custodians, with an entry/exit log. Evidence does not sit on desks, even briefly.
5. Analysis on the original drive
A junior examiner mounts the suspect drive directly on a Windows workstation “just to look quickly.” Windows updates file access times, the NTFS journal replays, and the drive is now modified. Source hash no longer matches what was recorded at acquisition.
The fix: original drive goes into evidence storage immediately after acquisition. All analysis happens on the image. The original drive is only re-accessed if a re-acquisition is required, and that re-access happens through a write-blocker with a new chain entry.
6. Tool or workstation logs that contradict the chain
The chain says the evidence was processed at Workstation 5 between 10:00 and 14:00 on a specific date. Workstation 5’s USB activity log shows the evidence drive was connected from 09:30 to 15:00. There is now an unexplained gap on either end.
The fix: match form entries to system reality. Use evidence-handling workstations whose USB and access logs are themselves part of the chain. Do not improvise.
7. Personal devices entering the workflow
The examiner photographs evidence with their personal phone for “quick reference.” Those photos are now potentially discoverable, and the phone itself becomes part of the chain. Worse - if the phone backs up to a personal iCloud account, the photos are in a third-party service the defense can subpoena.
The fix: only agency-issued, evidence-controlled devices touch evidence. Cameras are issued, logged, and stored in the lab.
What the form actually contains
A working chain of custody form is not optional and not improvised. Most jurisdictions provide a standardized form, but the required fields are consistent:
CASE INFORMATION
  Case identifier:      [unique case number]
  Item identifier:      [unique evidence number]
  Description:          [make, model, serial, condition]
  Seizing officer:      [name, badge/ID, signature]
  Date/time seized:     [precise timestamp]
  Location seized:      [physical address + room/area]
  Witness:              [name, signature]

DIGITAL EVIDENCE METADATA
  Source media:         [drive serial number, capacity]
  Acquisition tool:     [FTK Imager 4.7, dd 9.4, etc.]
  Image format:         [E01 / raw / AFF]
  Acquisition date:     [timestamp]
  Source SHA-256:       [64-char hash]
  Image SHA-256:        [64-char hash]
  Hashes match:         [yes — initials of verifier]

CUSTODY TRANSFERS
  Each row:
    Date/time | From (signature) | To (signature) | Reason | New location

  Examples:
    2026-05-31 14:30 | OFC Smith (sig) | Lab Tech Jones (sig) | Lab intake | Evidence Locker 12
    2026-06-01 09:15 | Lab Tech Jones (sig) | Examiner Lee (sig) | Acquisition | Workstation 5
    2026-06-01 13:45 | Examiner Lee (sig) | Lab Tech Jones (sig) | Storage | Evidence Locker 12
    ...

ACQUISITION LOG (attached)
  Tool output:          [FTK Imager log file]
  Verification result:  [PASS / FAIL with details]

FINAL DISPOSITION
  Released to:          [name, agency, date, signature]
  OR Destroyed:         [date, method, witness]
Every field matters. A missing field is the foothold a defense attorney needs.
Operational habits that prevent breaks
One case, one drive, one workstation. Do not cross cases. Do not move evidence between workstations mid-analysis. Cross-contamination is a defense attorney’s favorite challenge.
Hash everything before and after every transfer. When evidence comes out of storage for analysis, hash it. When it goes back in, hash it again. The numbers must match.
Photograph the form fields as you fill them in. Phone the photos to evidence storage. The photographic record proves the form was filled in at the time and place documented, not retroactively.
Use evidence bags with tamper-evident seals and unique serial numbers. The seal number goes on the form. The defense cannot argue the bag was opened and resealed.
Pre-print custody forms with the case identifier. Custom forms made in the moment introduce ambiguity. Standard forms with case-specific identifiers reduce the chance of accidental case mixing.
Maintain a log of who has access to evidence storage - keycard logs, sign-in sheets, video surveillance. Court will ask whether anyone else could have accessed the evidence between custody events.
Train every person who might handle evidence. The most expensive failures come from well-meaning people who do not know the rules. New IR analysts, first-responding officers, and helpdesk staff who get pulled into an incident all need a 1-hour custody primer.
When the chain breaks anyway
It happens. A signature gets missed. A storage room access goes unlogged. A USB drive sits on a desk for an hour because the examiner stepped away for a meeting.
What to do:
- Document the break immediately. Note what happened, when, and who knows about it. Do not try to cover it up - the cover-up always ends worse than the original mistake.
- Assess salvageability. Sometimes a witness statement can fill the gap: “I was in the room with the evidence from 14:00 to 15:00 and no one else entered.” Sometimes a system log can: “The keycard log shows no one entered the evidence room during that window.”
- Tell the prosecutor or legal counsel. They decide whether the evidence can still be used, whether it needs to be re-acquired, or whether the case strategy needs to change.
- Write the after-action. What process change prevents this break from recurring? Train the team on the new process.
The worst response is silence. Defense will find the break during discovery. It is always better to disclose proactively with a corrective action plan than to be confronted with the break during cross-examination.
CHFI exam tips
Topics this post covers that appear on the CHFI v10 (312-49) exam:
- Definition and scope of chain of custody
- Required fields on a chain of custody form
- The legal consequence of a broken chain (inadmissibility, suppression)
- Hash verification at acquisition, before analysis, and after analysis
- Federal Rules of Evidence around digital evidence authentication (Rule 901 specifically)
- The difference between original evidence and a forensic copy (and which can be used in court)
- Storage requirements for evidence between acquisition and trial
Scenario questions are common: “An examiner discovers at trial that no one signed the receipt when the evidence moved from the scene to the lab. What is the likely outcome?” Answer: defense moves to suppress; judge typically grants; evidence excluded; case may collapse.
Related Posts
- Disk Imaging in Forensics: dd vs FTK Imager vs Autopsy - the acquisition step that starts the chain
- Cybersecurity Incident Response: Basics and How to Get Started - the IR context where chain of custody applies
- Incident Response Plan Template for Mid-Market Customers - the IR plan that should include evidence-handling SOPs
- Cybersecurity Incident Response: Preparation - pre-incident readiness that includes custody documentation
Practice with free flashcards, 1,200 questions, and 15 forensics modules at forensics.it-learn.io — built specifically for the CHFI v10 exam (312-49). Free with a quick signup.
Based on US Federal Rules of Evidence (Rule 901, 902, 1001-1008), NIST SP 800-86, and ISO/IEC 27037. Local jurisdiction rules may differ; consult counsel before live deployment of evidence-handling procedures.


