
Every photo from every phone for the past 15 years has carried a hidden file inside the file — a structured record of when, where, and how it was taken. That record is EXIF metadata, and it is often the single most useful piece of forensic evidence in any investigation that involves a photograph.
GPS coordinates that pin the photographer to a specific street corner. Camera serial numbers that match across thousands of seized photos from the same device. Software signatures that prove an image was edited and what tool did the editing. Timestamps that contradict an alibi. All of it lives inside the image, invisible to the casual viewer, until an examiner runs a 30-second command.
This post is the field guide. We cover what EXIF actually is, the tags that matter in forensic work, how to extract them, real-case scenarios where EXIF cracked the investigation, the techniques attackers use to strip or fake it, and the operational habits that turn a raw image into court-ready evidence.
What EXIF metadata actually contains
EXIF (Exchangeable Image File Format) is a metadata standard maintained by the Camera & Imaging Products Association. Every JPEG, TIFF, HEIC, RAW, and most WEBP files have an EXIF block. The block contains:
Technical / camera fields:
- Make and model of the camera or phone
- Lens model (especially detailed on mirrorless and DSLR)
- Camera serial number (often included, sometimes stripped)
- Focal length, aperture, shutter speed, ISO
- Flash status, white balance, metering mode
Time fields:
- DateTimeOriginal — when the shutter fired
- DateTimeDigitized — when the camera wrote the file
- ModifyDate — when the file was last edited
- Time zone offset (if the camera knows it)
Geographic fields (if GPS is enabled):
- GPSLatitude, GPSLongitude (decimal degrees)
- GPSAltitude
- GPSTimeStamp
- GPSDateStamp
- GPSImgDirection (which way the camera was pointing)
Software fields:
- Software (the editor — “Adobe Photoshop 25.0”, “Snapseed 2.21”, “iOS 17.5.1”)
- ProcessingSoftware
- Creator / Author (if set in a desktop editor)
That is the EXIF block. Most images also carry IPTC (press-photography fields like caption, copyright, keywords) and XMP (Adobe’s XML format that holds EXIF + IPTC + custom fields). Forensic extraction tools read all three.
Why EXIF wins cases
Three specific evidentiary properties make EXIF disproportionately useful:
1. It is created automatically, not declared. A suspect can lie about when they took a photo. EXIF was written by the camera at the moment of capture without the suspect’s involvement. Tampering with it is detectable.
2. It contains corroboration that does not exist elsewhere. GPS coordinates from a 2026 phone are accurate to ~5 meters. They place the device at a specific location at a specific second. No witness statement, no badge swipe, no surveillance footage matches that fidelity in most environments.
3. It survives copying. When the suspect emails the photo, uploads it to cloud storage, or transfers it to another device, the EXIF travels with the file. The full evidentiary chain is recoverable from any copy that retained metadata.
Most defense strategies against EXIF evidence focus on undermining specific fields (“the GPS could be off by X meters”) rather than the existence of the metadata itself. That is a much weaker argument than challenging witness testimony or interpreting circumstantial evidence.
How to extract EXIF — exiftool is the answer
The forensic standard for metadata extraction is exiftool — a Perl-based command-line utility by Phil Harvey. It reads and writes 200+ metadata standards across hundreds of file formats, runs on Windows / macOS / Linux, and is the underlying engine of nearly every commercial forensics tool’s metadata module.
 1# Install
 2brew install exiftool                     # macOS
 3sudo apt install libimage-exiftool-perl   # Debian/Ubuntu
 4choco install exiftool                    # Windows (via Chocolatey)
 5
 6# Basic dump — every tag in the image
 7exiftool selfie.jpg
 8
 9# Forensic-grade dump — all tags, including unknown ones, grouped by source
10exiftool -a -u -g1 selfie.jpg
11
12# JSON output for scripting
13exiftool -j selfie.jpg > metadata.json
14
15# Just the GPS — formatted for Google Maps
16exiftool -gps:all -c "%.6f" selfie.jpg
The -a -u -g1 flag combination is the forensic pattern:
-a— show duplicates (the same field may appear in EXIF, XMP, and IPTC with different values, and the discrepancy itself can be evidence)-u— include unknown tags (modern phones write custom proprietary tags that may have meaning to the device manufacturer)-g1— group tags by their source (EXIF:,XMP:,IPTC:,MakerNotes:) so you can see exactly which standard wrote which field
For a case with hundreds or thousands of photos, batch-extract:
1# CSV of every photo in a directory with selected fields
2exiftool -csv -r -DateTimeOriginal -GPSLatitude -GPSLongitude \
3  -Make -Model -SerialNumber /evidence/case-001/photos/ > photos.csv
That CSV becomes the spreadsheet you hand to the lead investigator. Sort by SerialNumber to cluster photos by device. Sort by DateTimeOriginal for chronological timeline. Plot GPS coordinates on a map for spatial analysis.
The forensic story EXIF tells
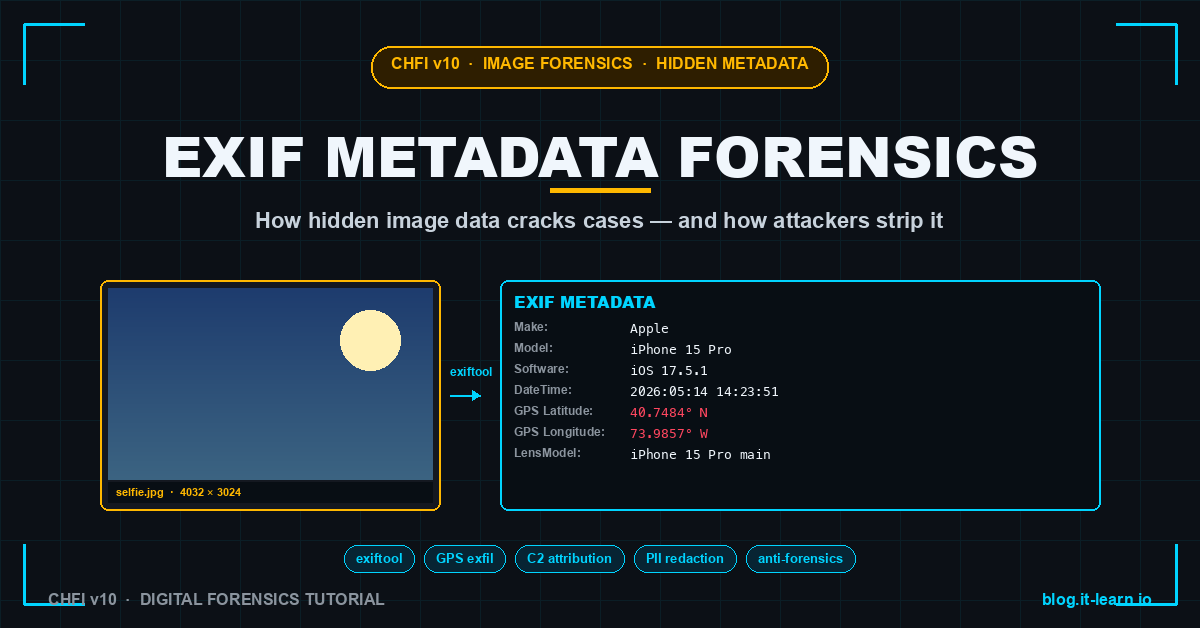
Walking through what an examiner sees in a real selfie EXIF dump:
EXIF:Make             = Apple
EXIF:Model            = iPhone 15 Pro
EXIF:Software         = iOS 17.5.1
EXIF:DateTimeOriginal = 2026:05:14 14:23:51
EXIF:CreateDate       = 2026:05:14 14:23:51
EXIF:ModifyDate       = 2026:05:14 14:23:51
EXIF:GPSLatitude      = 40 deg 44' 54.24" N
EXIF:GPSLongitude     = 73 deg 59' 8.52" W
EXIF:GPSAltitude      = 10.5 m Above Sea Level
EXIF:LensModel        = iPhone 15 Pro back triple camera 6.86mm f/1.78
EXIF:FocalLength      = 6.86 mm
EXIF:ExposureTime     = 1/120
EXIF:ISO              = 100
MakerNotes:RunTime    = 1234567 (boot time delta — proves device identity)
Examiner reads this and knows:
- What device: iPhone 15 Pro running iOS 17.5.1 (narrows manufacturer + OS version)
- When: May 14, 2026 at 14:23:51 (Original / Create / Modify all match — likely unedited)
- Where: 40.7484° N, 73.9857° W — Times Square, Manhattan (Google Maps that)
- Conditions: outdoor (ISO 100 means bright daylight), no flash, wide camera with the main lens
If the case is “the suspect claims they were not in Manhattan that afternoon,” this single metadata dump is the case.
Real-case patterns
Pattern 1 — GPS pinning location
Lockheed Martin engineer photographed a classified document. The photo was sent via Signal, screenshotted, and ended up on a tip line. When law enforcement obtained the original Signal-sent file (recovered from a backup), the EXIF showed GPS coordinates pinning the photo to inside the suspect’s home — proving they were the source rather than a third party who received the document.
The signal: even one image with retained metadata can collapse an entire “I don’t know how that got out” defense.
Pattern 2 — Camera serial number cluster
In a CSAM investigation, hundreds of seized photos were analyzed for EXIF SerialNumber. Three distinct serials emerged. Two matched cameras seized at the suspect’s home. The third did not. That third serial led to a co-conspirator the suspect had never mentioned — the photos linked the two devices irrefutably even though the images themselves did not show identifying features.
The signal: SerialNumber clusters identify devices that participated in producing the evidence even when no other connection is obvious.
Pattern 3 — Timeline contradiction
A workplace harassment case. Defendant claimed the photo of the alleged victim was taken at a company holiday party in December. EXIF DateTimeOriginal showed July. The photo’s GPS placed it at the defendant’s home, not the company office. Two metadata fields, both written by the camera at capture, both contradicting the defendant’s story.
The signal: timestamps and locations from EXIF are date-of-capture truth, not date-of-filing truth.
Pattern 4 — Software signature exposes editing
A photo submitted as evidence in a defamation suit purported to show an unaltered screenshot. EXIF Software field showed “Adobe Photoshop 25.0” — proving the image had been opened in Photoshop. The plaintiff did not dispute opening it (“just to crop”), but the admission opened the door to a forensic comparison that found content changes beyond cropping.
The signal: even when content tampering is not immediately visible, software signatures prove tools were used.
How attackers (and savvy users) strip EXIF
Stripping EXIF is trivial:
1# exiftool one-liner
2exiftool -all= -overwrite_original suspect_photo.jpg
3
4# ImageMagick
5convert input.jpg -strip output.jpg
6
7# jpegtran (lossless)
8jpegtran -copy none input.jpg > output.jpg
Most social media platforms strip EXIF automatically on upload (Facebook, Instagram, Twitter/X, LinkedIn). The image you download from Instagram is not the image the photographer uploaded — Instagram stripped it. Important for forensics: an image obtained from social media has no EXIF; the original from the camera or phone does.
Detection of stripping:
- Empty EXIF block — possible but suspicious. A photo “from an iPhone” with no Make/Model field has been processed.
- Inconsistent timestamps across EXIF, XMP, file system — file system mtime later than EXIF DateTimeOriginal is normal; reverse is suspicious.
- Software field present, no other writer fields — image was opened in an editor that wrote its own “Software” tag but cleared other tags.
- Thumbnail mismatch — JPEGs often carry an embedded thumbnail. If the visible image differs from the thumbnail (cropped differently, recolored), the image was edited.
Detection of tampering
If a defendant claims an EXIF value is faked, the examiner looks for inconsistencies:
1. Timestamps that pre-date the camera model. iPhone 15 Pro EXIF dated 2020 — impossible. The 15 Pro was released in 2023.
2. GPS coordinates that conflict with sun angle. Photo’s lighting suggests early morning; GPS coordinates + timestamp would put the sun directly overhead. Sun position is calculable from lat/lon/time; mismatches betray fabrication.
3. Mismatched values between EXIF, XMP, and IPTC. If exiftool reports EXIF:DateTimeOriginal = 2026:05:14 and XMP:CreateDate = 2026:03:01, one of them was rewritten.
4. MakerNotes RunTime inconsistent with claimed device. Apple iPhones include a MakerNotes:RunTime field that reflects how long the device has been booted at the moment of capture. RunTime patterns across many photos from the same device should form a coherent boot/sleep history. Anomalies indicate metadata transplant.
5. JPEG quantization tables that do not match the claimed camera. Every camera has a signature JPEG compression profile. A photo claiming to be from an iPhone but using Photoshop’s quantization table is forged in transit.
The combined picture of EXIF + structural image analysis is what court-grade tampering analysis looks like. No single field proves tampering — patterns of inconsistency do.
Operational habits for evidence images
1. Extract EXIF before any other processing. Open the image in a viewer, and OS-level access time gets updated. Some viewers strip or rewrite EXIF on save. Extract metadata from a forensic copy first; analyze visually second.
2. Document the extraction tool and version. “exiftool 12.91” is part of the chain of custody. A different version may parse a field differently.
3. Hash the image before and after extraction. Extraction itself should not modify the file, but verifying the hash catches accidental writes (some “viewer” tools open and re-save).
4. Preserve the original alongside the analysis. Always work from a copy of a copy. The original goes into evidence storage with chain of custody.
5. Cross-reference EXIF with file-system metadata. Created/Modified/Accessed timestamps from the file system are separate from EXIF timestamps. Discrepancies are evidence — note them. The file-system metadata is also forensic data.
6. For GPS-bearing images, plot on a real map. Coordinates alone are abstract. A KML export plotted in Google Earth or QGIS makes location patterns immediately visible.
1# Export GPS data as KML for Google Earth / QGIS
2exiftool -if '$gpslongitude' -fileOrder gpsdatetime \
3  -p '$filename,$gpslatitude,$gpslongitude,$gpsdatetime' \
4  -r /evidence/photos/ > locations.csv
CHFI exam tips
EXIF / image metadata topics on the CHFI v10 (312-49) exam:
- The structure of EXIF, IPTC, and XMP metadata blocks
- Which standard tools (exiftool, ExifReader) are court-acceptable for extraction
- The list of forensic-critical EXIF fields (Make, Model, DateTimeOriginal, GPS, Software)
- Detection of metadata tampering — pre-release timestamps, sun-angle inconsistency
- The role of MakerNotes and why MakerNotes vary by vendor
- Why social-media images lack EXIF (platform-side stripping)
- File format support — JPEG, TIFF, HEIC, RAW, and the metadata each supports
Scenario questions: “An examiner extracts EXIF from a JPEG and finds a DateTimeOriginal of 2019:03:14 but a Software field reading ‘iPhone 13 Pro’ (released 2021). What does this indicate?” Answer: timestamp tampering — the photo’s claimed date precedes the camera’s existence.
Related Posts
- Disk Imaging in Forensics: dd vs FTK Imager vs Autopsy — the acquisition step that produces the image collection EXIF analysis runs against
- Chain of Custody: The Single Mistake That Loses Court Cases — what to do with the metadata findings after extraction
- Windows Event Log Forensics: What Each Event ID Actually Means — complementary host-level timeline reconstruction
- Deepfake CEO Fraud: Voice Cloning Social Engineering — adjacent media-authenticity attack class
Practice with free flashcards, 1,200 questions, and 15 forensics modules at forensics.it-learn.io — built specifically for the CHFI v10 exam (312-49). Free with a quick signup.
exiftool 12.91 used as the canonical extraction tool. EXIF specification 2.32 referenced. Forensic patterns drawn from public court records and US v. CSAM-investigation case law.


